 We use cookies to ensure that we give you the best experience on our website.
 Multivendor Platinum App Documentation
How to Create Cedcommerce Marketplace App
Introduction
Multivendor App converts "CedCommerce Magento Marketplace store to mobile shopping app", fully synchronized with cedcommerce marketplace to provide real time data with best user experience. Multivendor App will boost your revenue exponentially & will provide customer's best shopping experience and vendor's best shop management. Vendors/Sellers will be able to see their Dashboard, Manage Orders, Create Product and many more activities can be performed. This manual will explain step by step process to build and configure app.
Types Of Apps
We have two types of app which will cover all features of Cedcommerce Marketplace.
-
1)Basic App
Our Basic App provide following functionality.
- Customization Of App
- Add Launcher Icon
- Add App Icon
- Vendor Dashboard
- Vendor Login
- Vendor Registration
- Vendor Profile
- Create/Edit Product
- Support Simple Product Creation/Editing
- Support Virtual Product Creation/Editing
- Manage Orders
- Manage Transactions
- Payment Settings
- Product Report
- Order Report
-
2)Platinum App
Our Platinum App provide fully featured cedcommerce platinum app features including vendor review & ratings, vendor product attribute, vendor social login and some other additional features. You can check below list for full platinum app features.
- Customization Of App
- Add Launcher Icon
- Add App Icon
- Vendor Dashboard
- Vendor Login
- Vendor Registration
- Vendor Profile
- Create/Edit Product
- Support Simple Product Creation/Editing
- Support Configurable Product Creation/Editing
- Support Bundle Product Creation/Editing
- Support Virtual Product Creation/Editing
- Support Grouped Product Creation/Editing
- Manage Orders
- Manage Invoice
- Manage Shipment
- Manage Credit Memos
- Manage Transactions
- Payment Settings
- Shipping Settings
- Product Report
- Order Report
- Vendor Social Login
- Vendor Review & Rating
App Installation
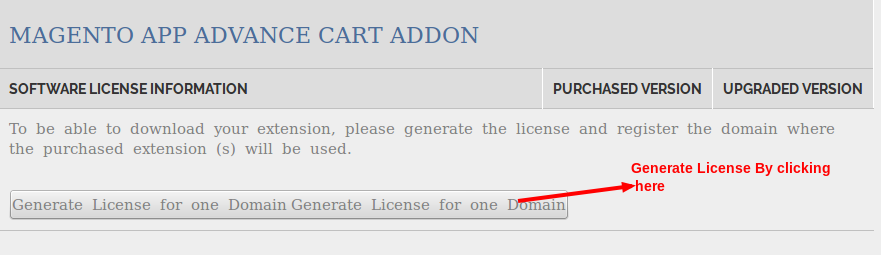
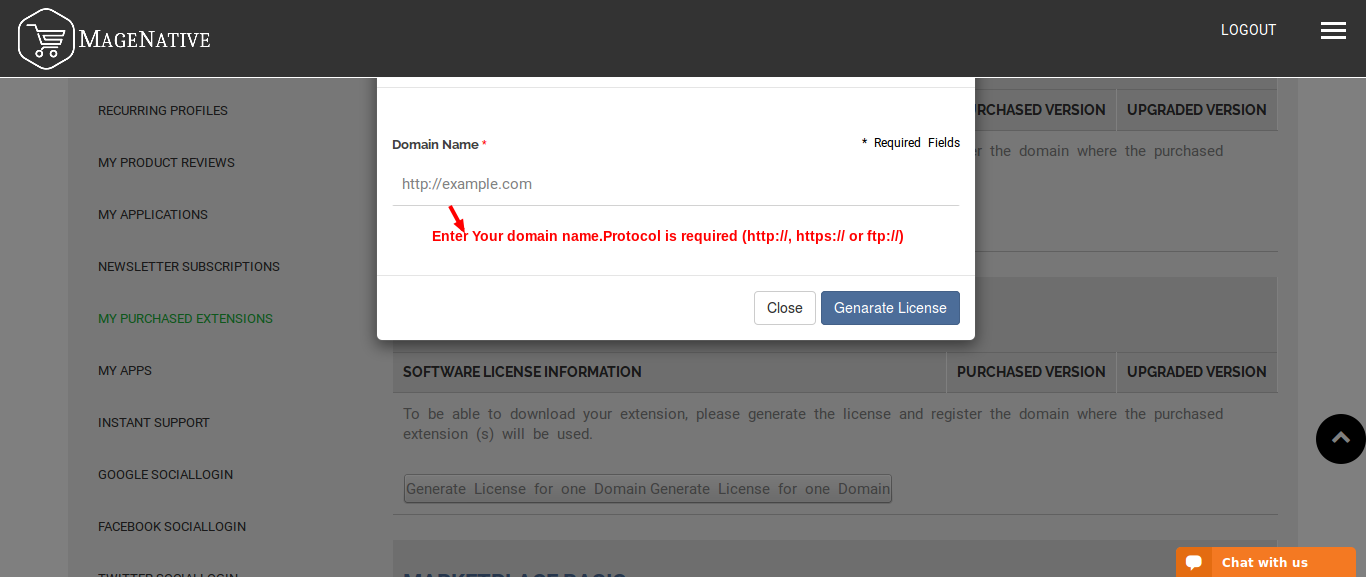
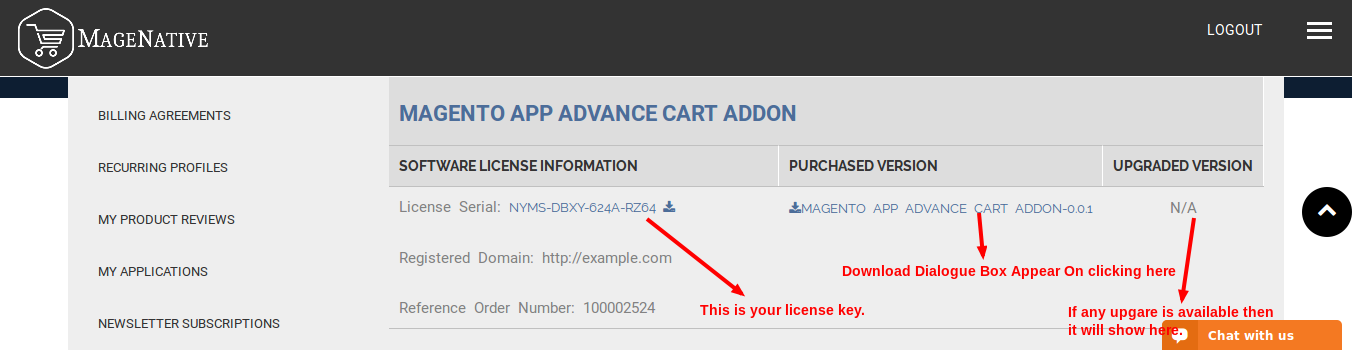
Once you buy multivendor app you can download connector module from "My Purchased Extension" tab in customer account section on our site MultivendorApps. There you can see a list of all purchased module. In order to download module first you will have to create license for your domain.You can create license by clicking on "Generate License For One Domain".
Follow the below easy steps to install connector:-
1)Pre Installation steps
-
Step 1: Disable Compilation
First of all check your compilation status by the System-> Tools -> Compilation if it is enabled, disable your compilation first.
After installation you can again enable your compilation. -
Step 2: Disable Cache
Disable your entire cache from the System -> Cache Management menu from the admin site.
After installation you can re-enable your cache. -
Step 3: Backup Database (Optional)
Before installation of the extension you can take backup of your database if any issue occurs during installation so you can revert back your database backup.
2)Installation Using Magento Connect
-
Step 1: Copy Extension Key
To install the extension from the Magento-Connect you just need to go to the relevant page where the ced-mobiconnect extension exists. Then choose your platform & copy your extension key.
-
Step 2: Install Extension By Key
Now go to the admin site of the magento site and go to the system ->Magento Connect ->Magento Connect Manager. Login to the downloader platform.
Paste your key to the below highlighted area and click on install.After clicking on install you will see the details of the extension with its version you can proceed and your extension will install in few moments.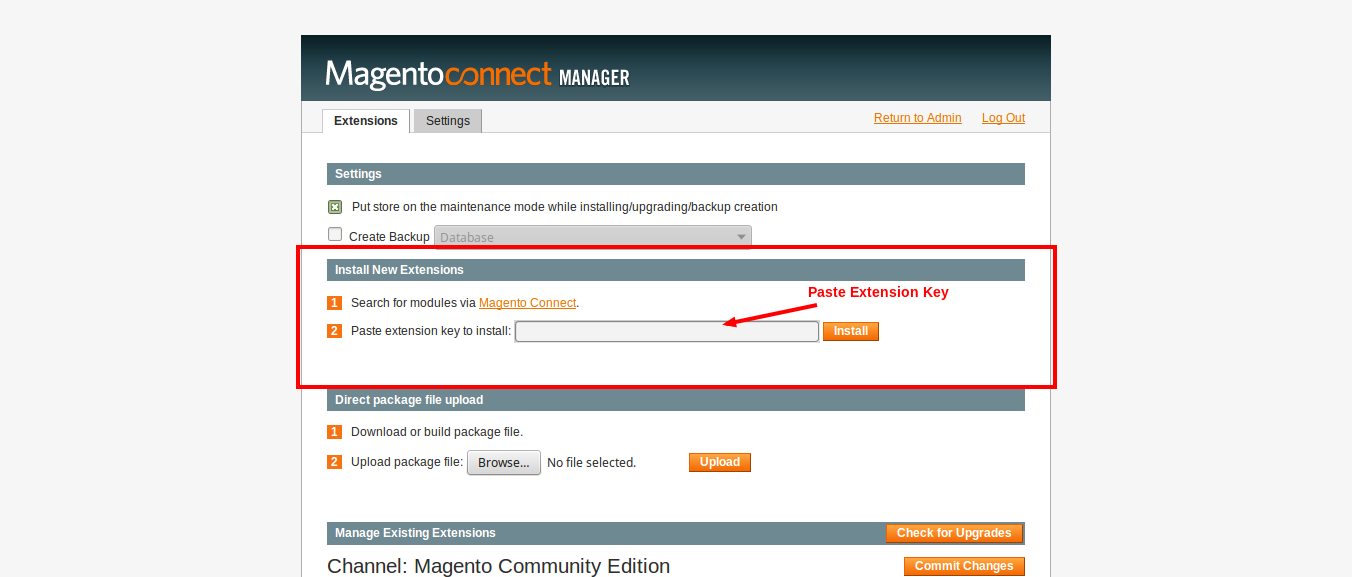
3)Installation Using Package Upload
-
Step 1:
When you purchased the extension from our official site you will get the full package of the extension.Go to the package downloader wizard (Magento Connect Manager).
-
Step 2:
Go to the section “Direct Package File Upload” and browse for the package then click to the upload button. This will install the extension and you can monitor the progress in the console bottom area.
4)Installation using ftp
-
Step 1:
If you have any issue in the installation process in the above two method you can use the native installation method by FTP. Connect your FTP and go to the root directory of the magento installation. Unzip our package which you get after purchase. You will get the two folders “Step 1” and “Step 2” Upload all the files of “step 1” to the root directory first after upload of the “Step 1” upload all the files of the “Step 2”.
5)Post Installation Steps
-
Step 1:
When you are done with the installation of the extension you can logout your admin and re-login to the admin section
-
Step 2: Enable Cache
Clear all the your caches first and if required can enable your cache.
-
Step 3: Enable Compilation
If you need compilation enabled you can enable it again
Build your app
You can build your app from "My Apps" tab in customer account section on our site MageNative Building an app is a 4 step process.We will discuss each step one by one.
Step 1: Design
This step will decide the look and feel of your app. So in this step you need to provide basic information about your shopping app. Please fill in all the fields and click save to move to next step.
App designing screen can be found as below screen.
- App Name: The name of your app which you want to display in app
- Domain Name: The domain of the store of which you want to generate app. If you purchased license for more than one domain then it will be select field otherwise the domain appears only as a label.
- Base URL: The base url of the store of which you want to generate app. You can get your base url from system->configuration->general->web->Secure->Base URL from magento admin.
- Package Name: The name of your app package. It should be unique and follow the syntax "com. Your_Domain_Name.App_Name".
- Version: The version of your app. It should be in this format "1.0.0".
- Header Hash Key: This is a autogenerated secret key.Make a note of it. You need it during configuring module, Without it your app will not receive api feeds.
-
Main Category Image: This is the image which will be showed on category list page in app.
Note: The image shows only if category banner is disabled or you didn't upload any category banner. -
Sub Category Image: This is the image which will be showed on sub-category list page in app.
Note: The image shows only if parent category does not have any product and if you didn't upload any category banner image from admin. - Placeholder Image: This is the image which will be showed until your image does not loads.
- Login Page Background Image: This is the image which will be showed in background on login page.
- Logo: The logo of your app which will be displayed on top of the home page. It must be a ".png" file with a dimension of 1024 x 1024(width x height)px.
- Logo Preview: This will show you the preview of the logo which you had uploaded in previous field for both android and ios app.
- App Icon: The icon of your app which will be shown in main menu of your phone.It must be a ".png" file with a dimension of 1024 x 1024(width x height)px.
- App Store Preview: This will show you the preview of the logo which you had uploaded in previous field for both android and ios app.
- Splash Screen: The splash screen image of your app which will be displayed whenever your app is loaded. It must be a ".png" file with a dimension of 512 x 512(width x height)px.
- Theme Color: This field will let you to decide the color of your app theme. You can easily select any color from color picker px.
- APP Store Preview: APP store preview will let you to see how your splash screen looks with selected image & color combination.
- Home Layout: APP store preview will let you to see how your splash screen looks with selected image & color combination.
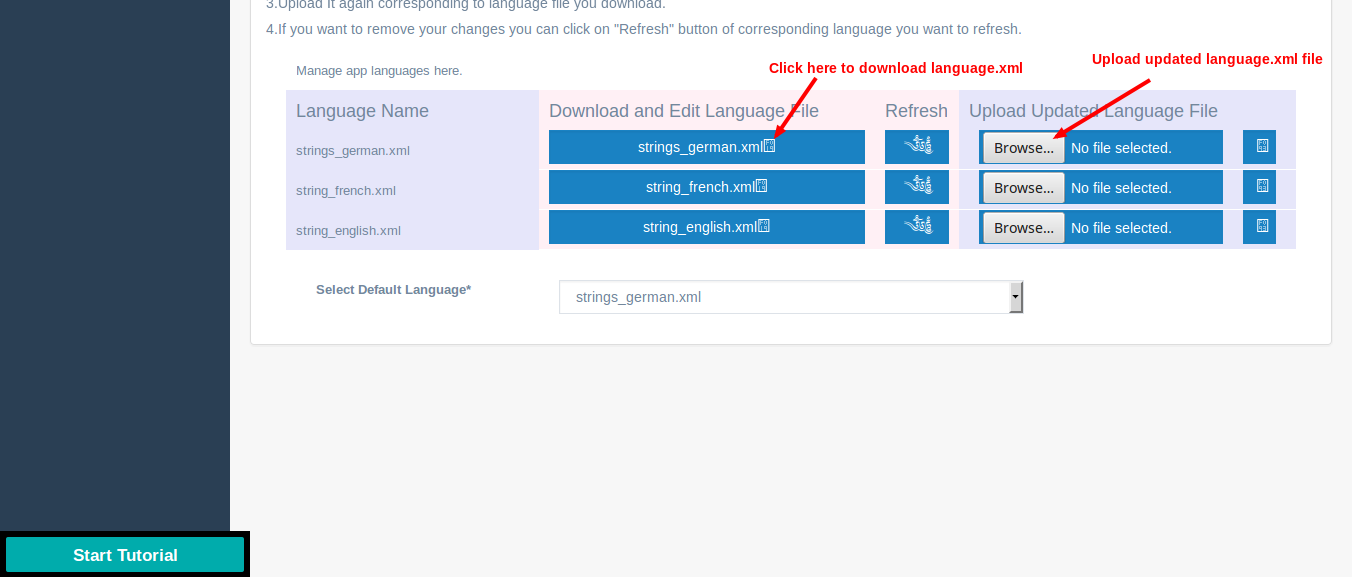
Step 2: Language
This step will allow you to define various text and labels coming in app in different languages so that when customer change store from app then they see various text and labels in default store language. You can change any text coming in app by downloading and replacing text with new text in "language.xml" file corresponding to language for which you want to change labels. Once you finshed editing upload the file again and click on save button on top right corner.
Step 3: Preview
In this step you need to provide some details to enable various important functionality like "Social Login", "Google Cloud Messaging", "Google Analytics" etc. You need to enter details separately for android and ios app.
Preview image screen will look as in below image
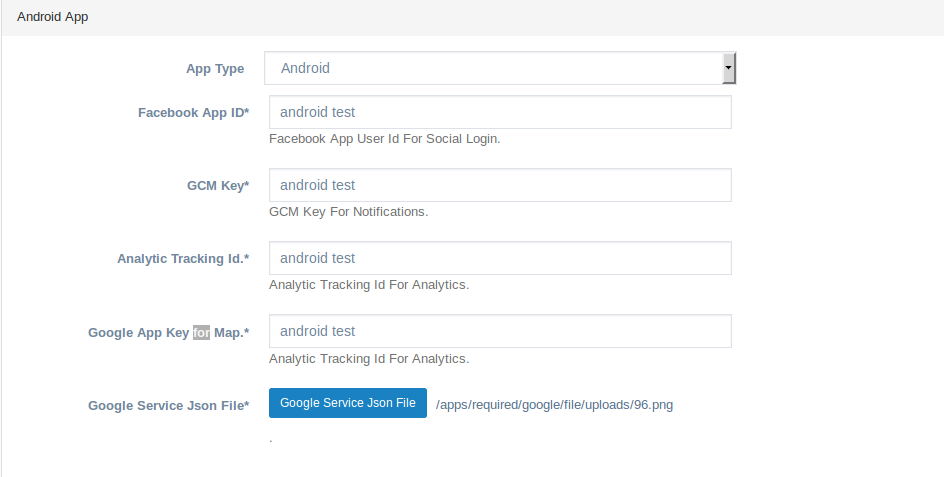
- APP Type: You can provide details for android and ios app separately by selecting "Android App" or "IOS App"
- Facebook App Id: We need facebook app id so that you can use facebook login in your magento app. You can get facebook login from Facebook App ID. To get facebook app id follow the steps listed there.
- GCM KEY: From here you can provide the gcm key in order to use google cloud messaging service in our app. You can get gcm key by signing up here GCM KEY and following the instruction given there.
- GOOGLE MAP KEY: From here you can provide your google map key. We need this to show your store on google app which comes under contact us page in our app.
- Google Service JSON: To use google analytics and google cloud messaging you have to upload the file. Click here Google Service JSON to create and download the Google Service JSON file.
- IOS Account User: IOS Account User Name. This field comes only if you select "IOS" in app type field above.
- IOS Account Password: IOS Account Password. This field comes only if you select "IOS" in app type field above.
Step 4: Go Live
This step will allow you to publish your google and ios app on respective store. You can publish your app either by your account or by using our account.
Live image screen will look as in below image
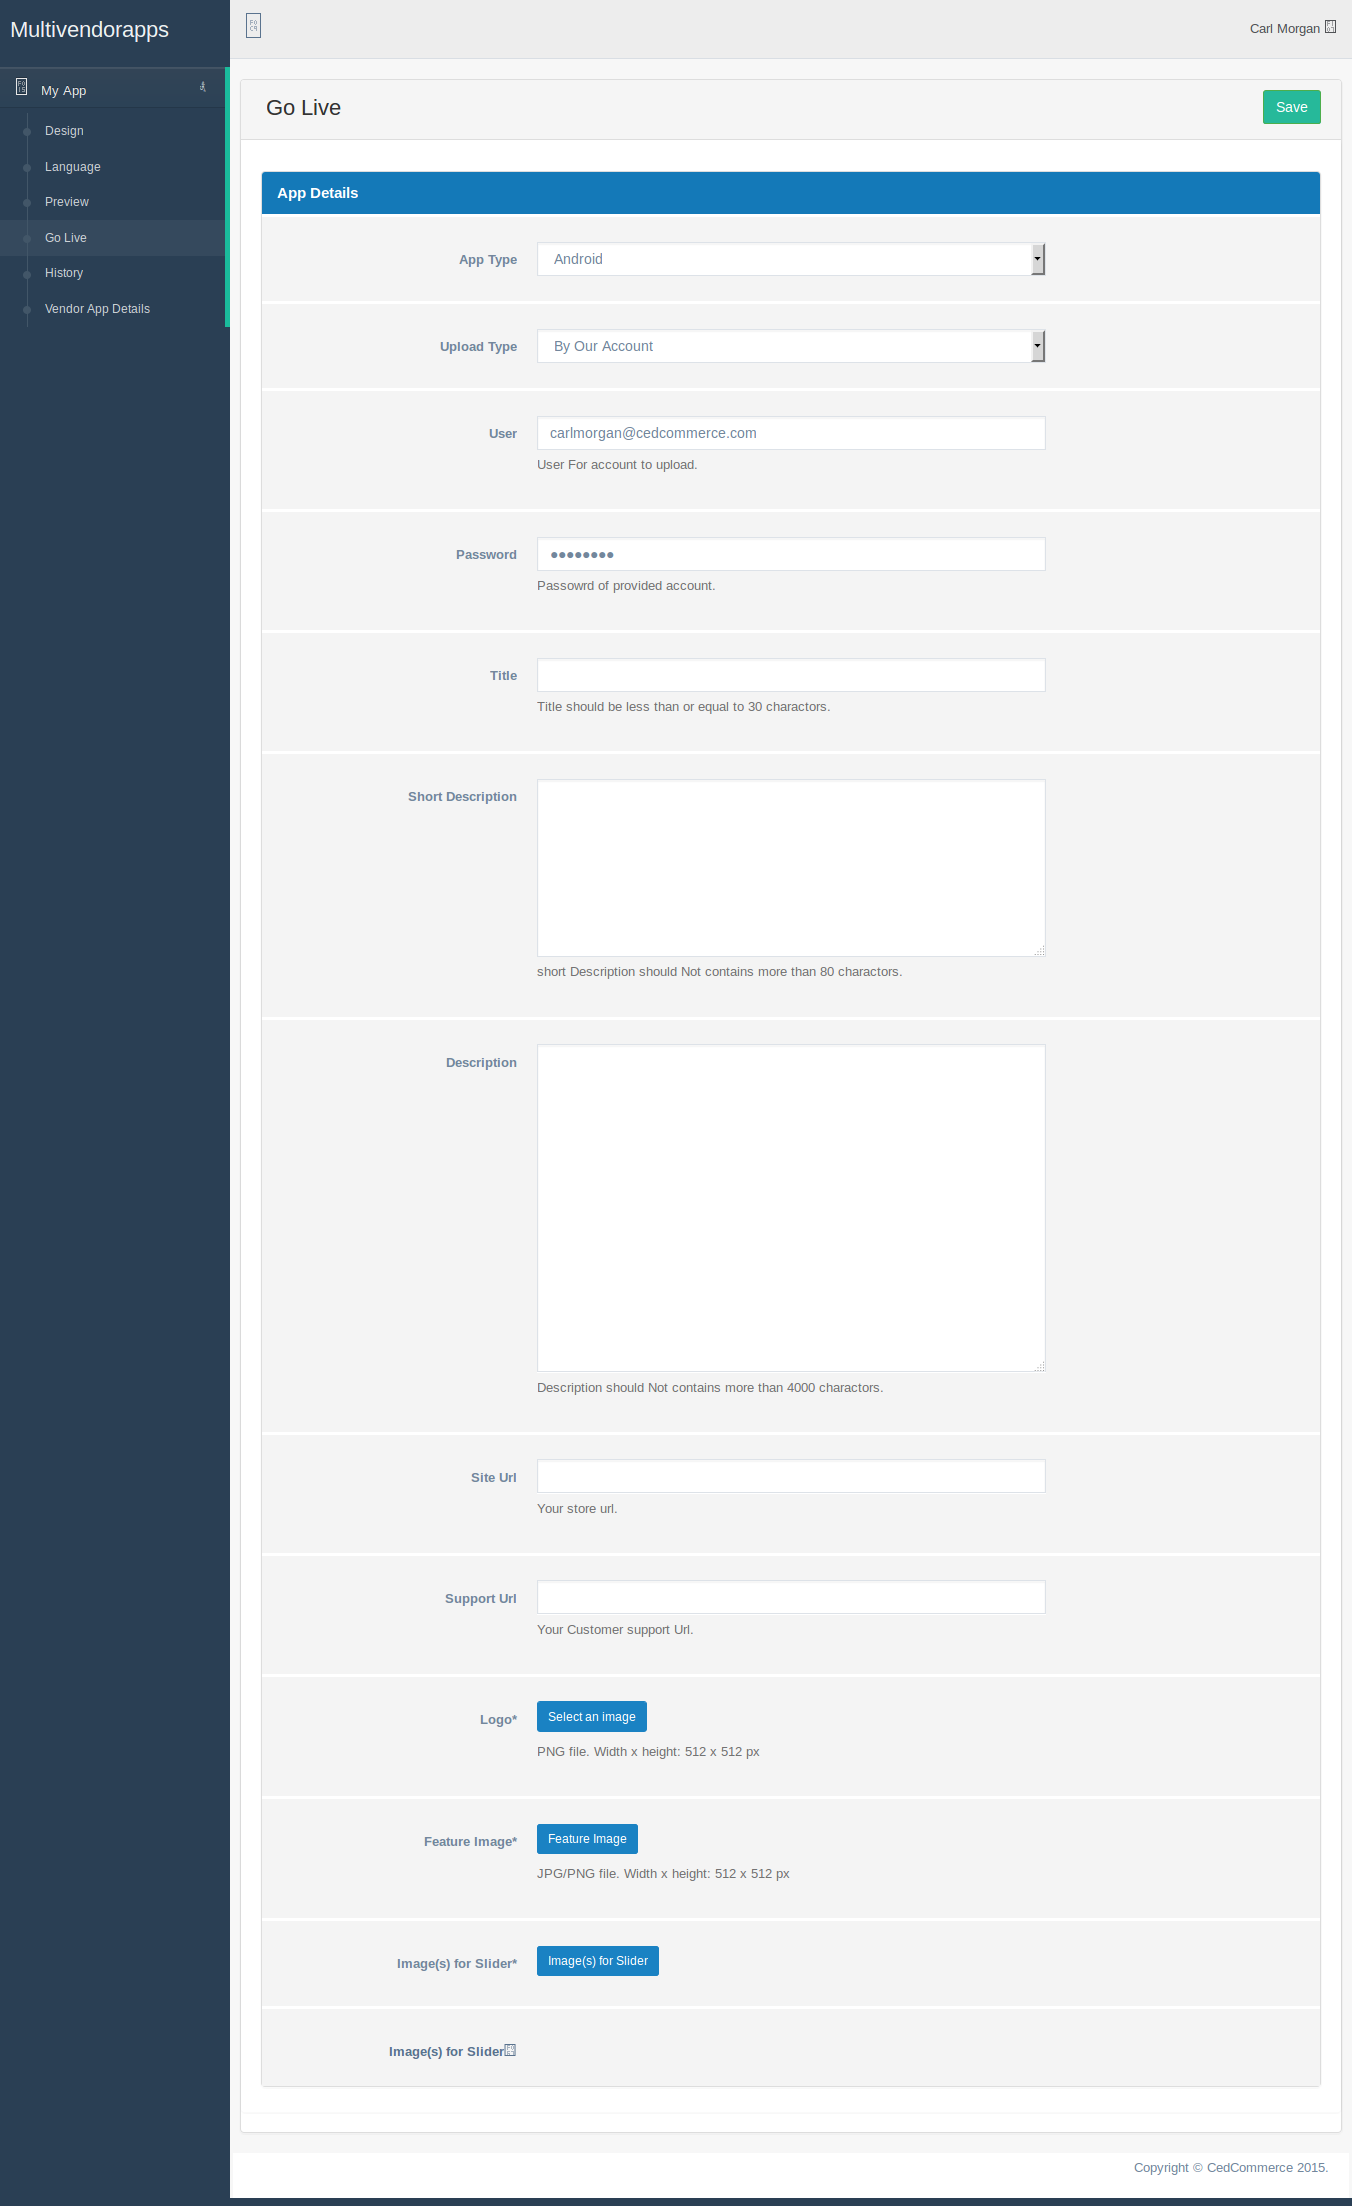
- APP Type: You can provide details for android and ios app separately by selecting "Android App" or "IOS App"
- Upload Type: From here you may select whether you want to publish your google or ios app on respective store by our or your account.
- User: This field only comes if you want publish app by your account. This is your account name with which you want to publish your app on respective store.
- Password: This is the password of your account with which you want to publish your app on respective store.
- Title: This field will allow you to provide title for your app which shows on store.
- Short Description: This field will allow you to provide short description for your app which shows on store.
- Description: This field will allow you to provide description for your app which shows on store.
- Site URL: This field will allow you to provide site url for your app which shows on store.
- Support URL: This field will allow you to provide support url for your app which shows on store.
- Logo: This field will allow you to provide logo for your app which shows on store.
- Feature Image: This field will allow you to upload main feature image of your app which shows on store.
- Feature Image For Slider: This field will allow you to upload multiple feature image of your app which shows in feature-slider on store. You can upload any number of image by clicking in images for slider link.
App Configuration
Once you are done with building app and connector installation you can configure various features of your app in connector. This section will explain you various ways to configure app using connector.
Configure Multivendor Platinum App
Multivendor App converts "CedCommerce Magento Marketplace store to mobile app" very easily.
Activate Your Module
To activate your module you have to enter the license key which you received in App installation step in system->configuration->License Info section under "CEDCOMMERCE" tab.

Enable/Disable Multivendor Module
It is a yes/no type field which is used to enable or disable multivendor module.
To enable/disable module please go to System->Configuration->Marketplace App. You can set it up by changing value in below highlighted area from magento admin panel.

Note: If it is set to NO then your app will not receive api feed from magento site.
App Unique Key
We use this unique key to authenticate app with connector.You can get the app unique key from our dashboard.
To setup secret key please go to System->Configuration->Marketplace App. You can set it up by changing value in below highlighted area from magento admin panel.

Enable/Disable Google Cloud Messaging
It is a yes/no type field which is used to enable Google Cloud Messaging on your app.
To setup new arrival product group please go to System->Configuration->Marketplace App. You can set it up by changing value from below highlighted area in magento admin panel.

Note: If it is set to NO then Google Cloud Messaging functionality will not work.
Features Of Multivendor Platinum APP
- Customization Of App
- Add Launcher Icon
- Add App Icon
- Vendor Registration
- Vendor Login
- Vendor Dashboard
- Vendor Profile
- Create/Edit Product
- Support Simple Product Creation/Editing
- Support Virtual Product Creation/Editing
- Support Bundle Product Creation/Editing
- Support Configurable Product Creation/Editing
- Support Grouped Product Creation/Editing
- Support Custom Option
- Support Related Products
- Support Cross-Sell Products
- Support Up-Sell Products
- Manage Orders
- Manage Invoices
- Manage Shipments
- Manage Credit Memos
- Manage Transactions
- Payment Settings
- Shipping Settings
- Product Report
- Order Report
Vendor Registration
Multivendor Platinum APP will allow people to create vendor profile on your site and starts selling their products. Our app will allow to create vendor profile by providing some basic information from vendor registration form as shown in below image.
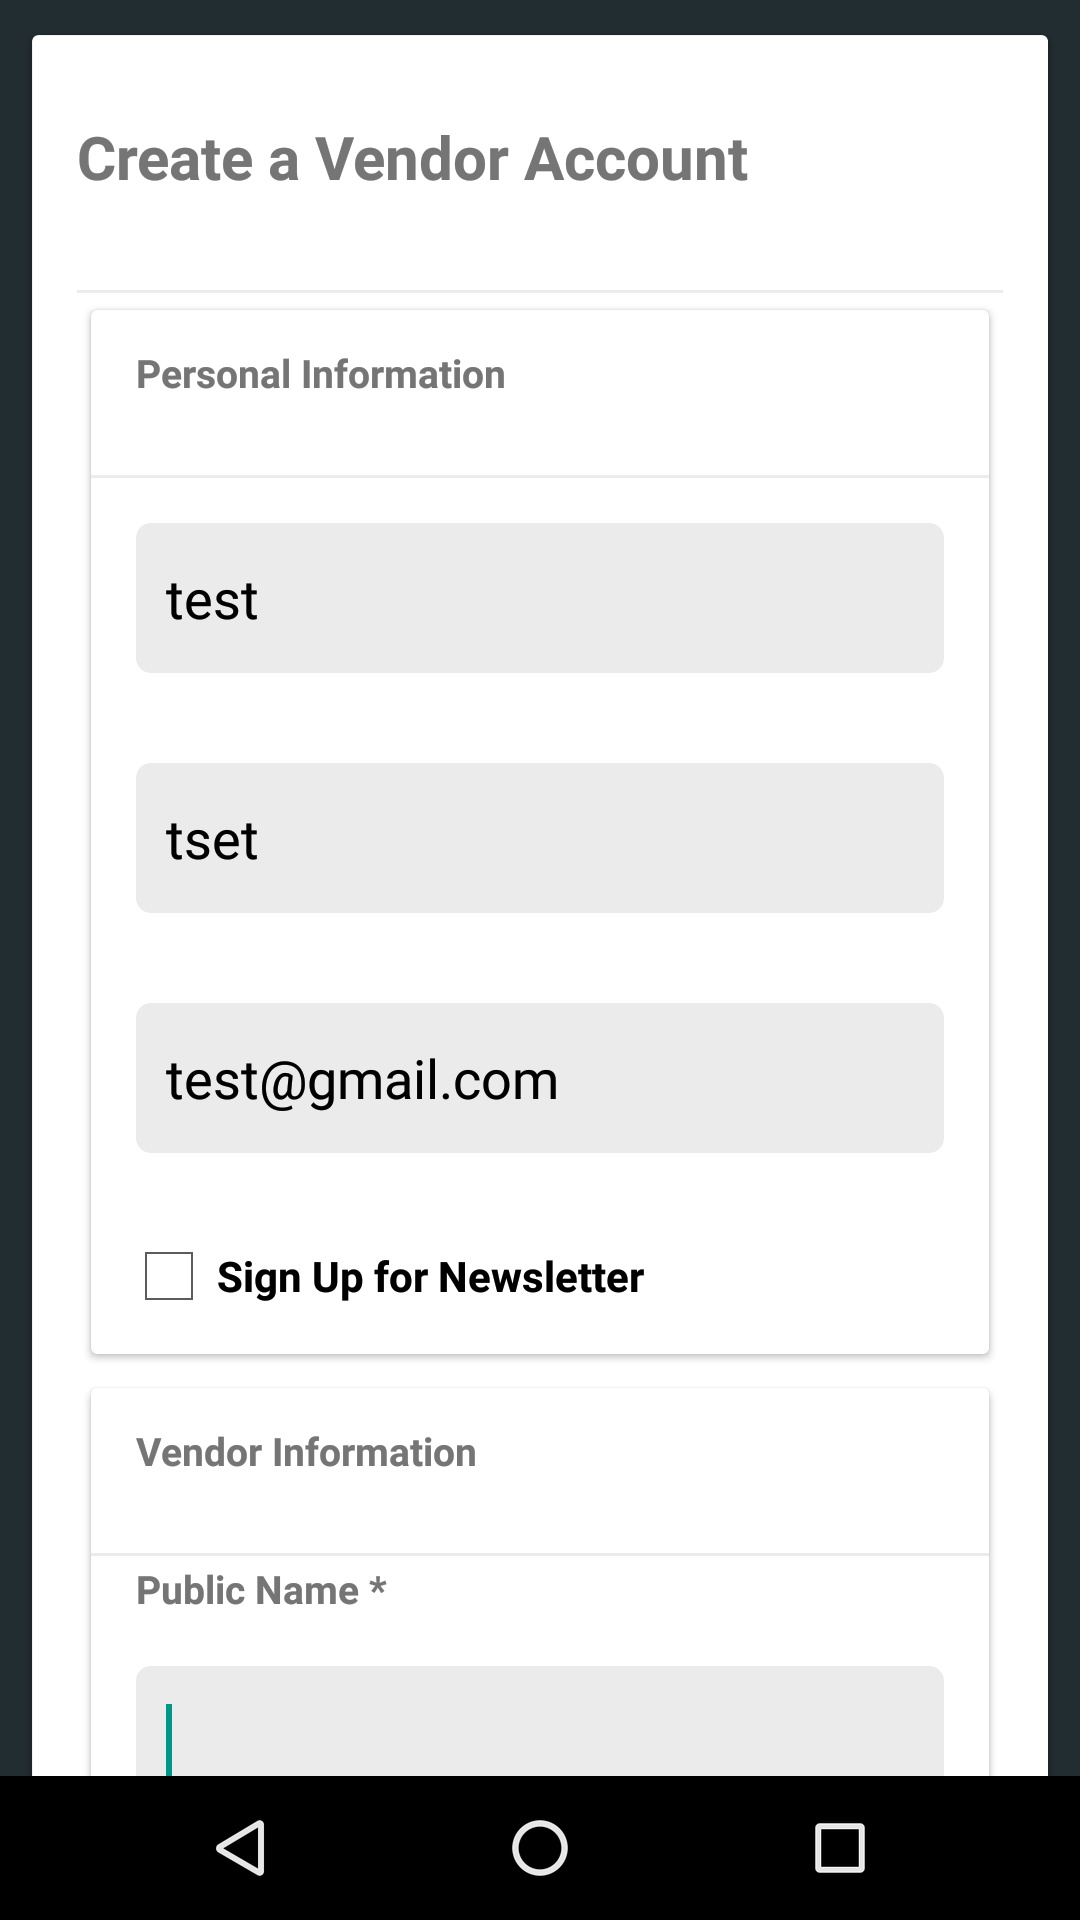
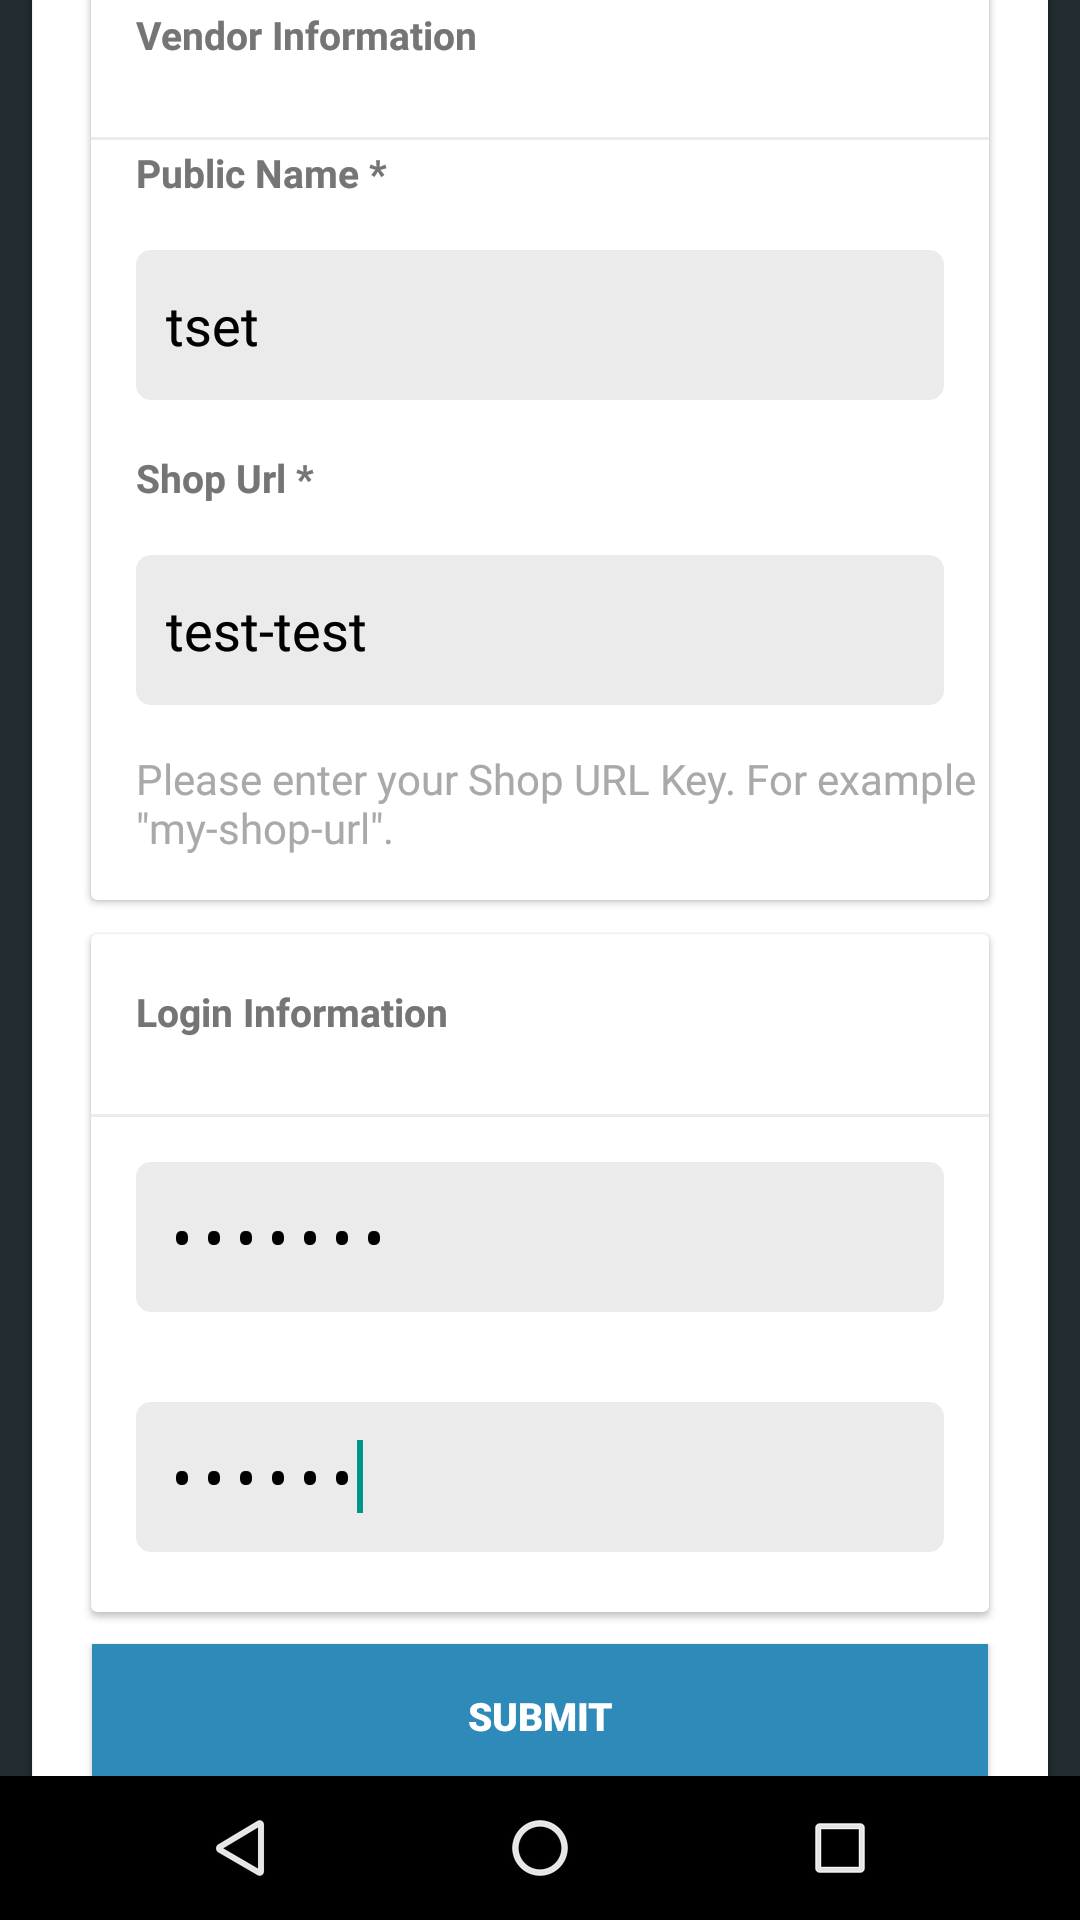
Vendor will not be able to log in into its account until admin approves the vendor account.
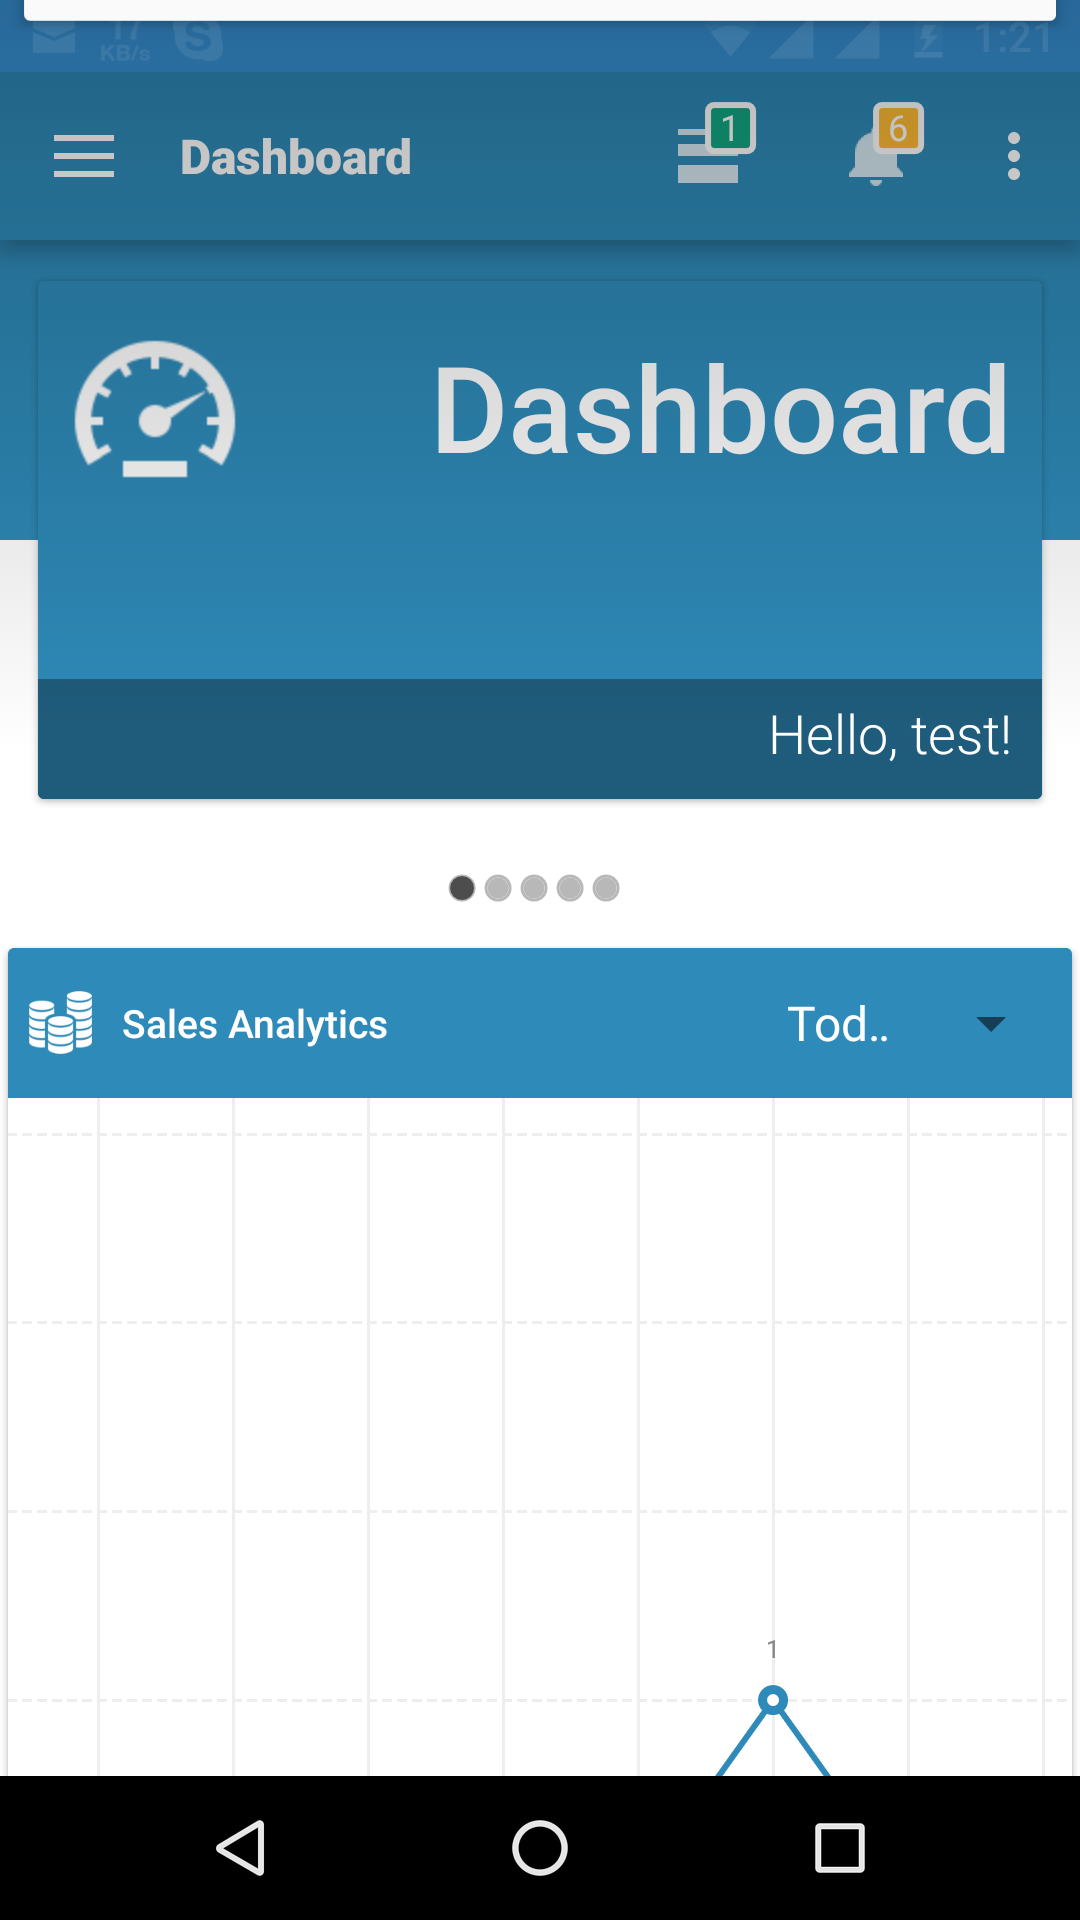
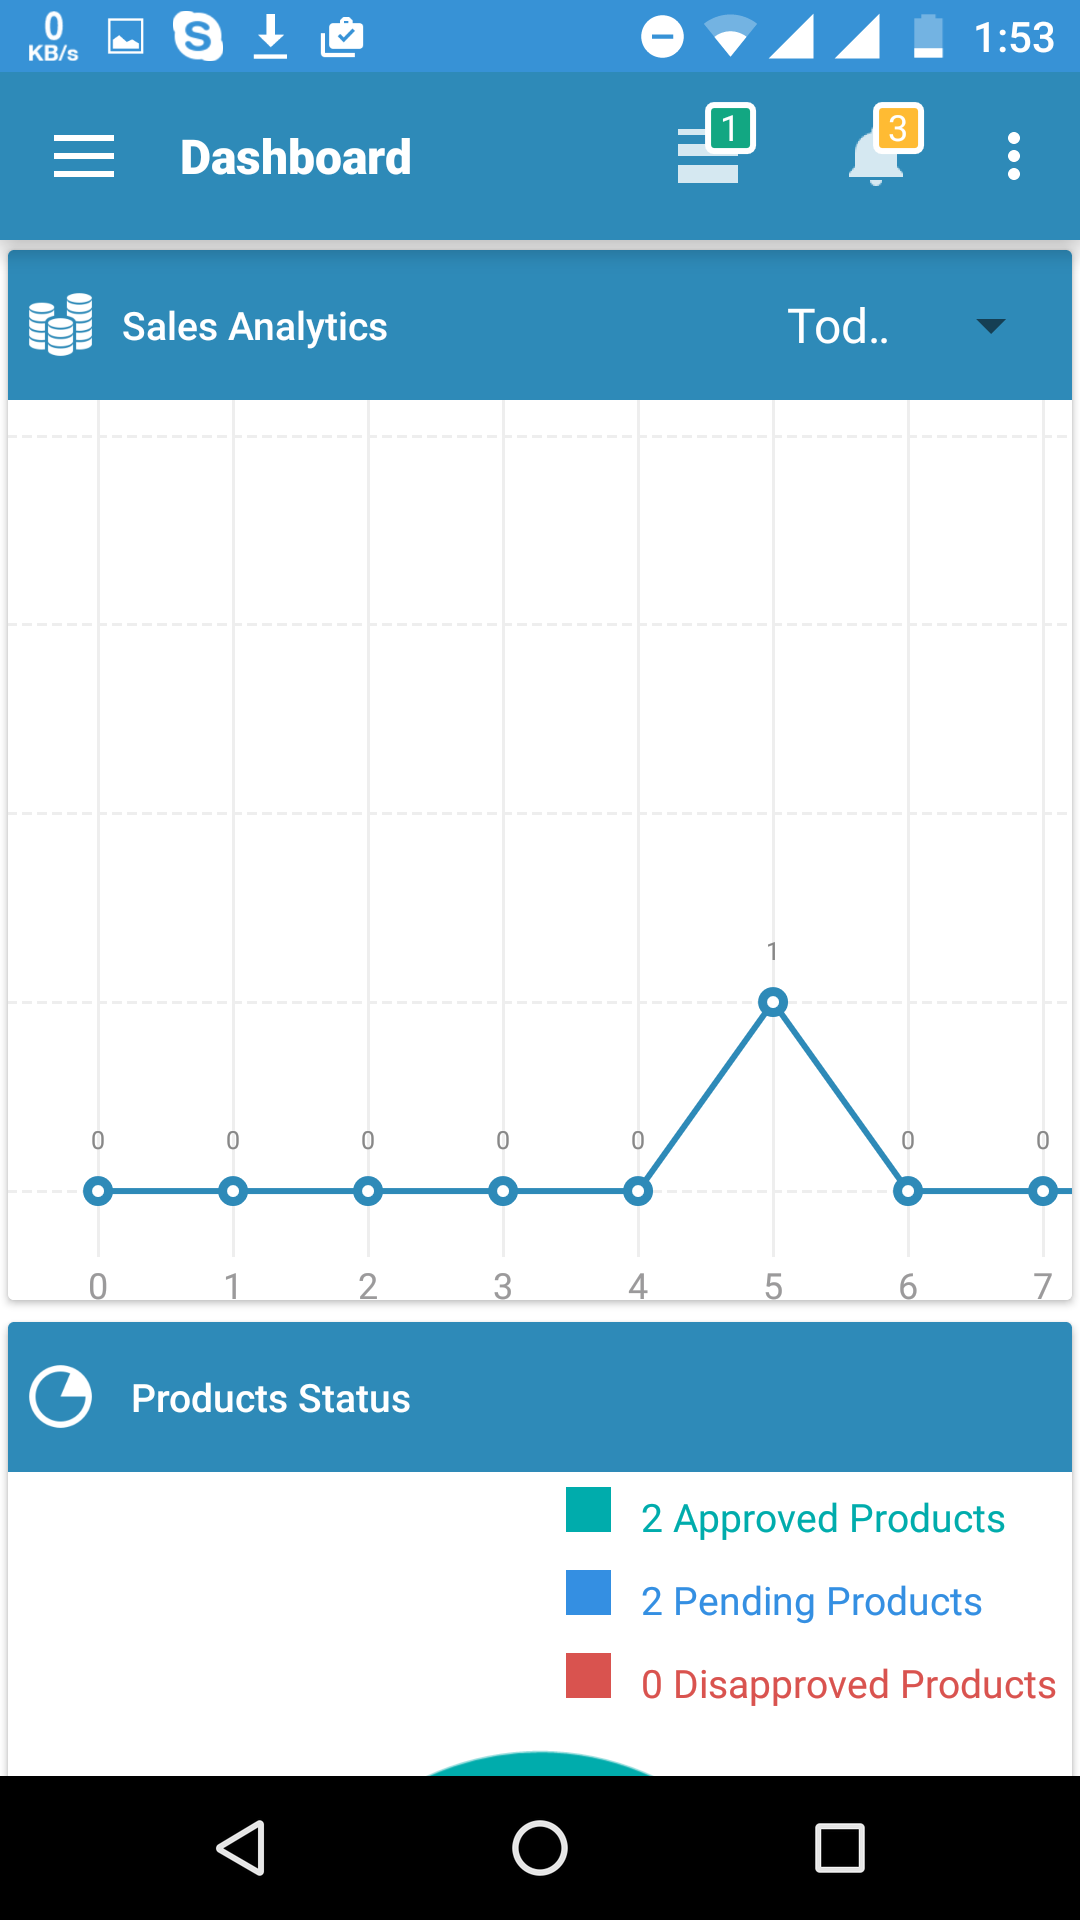
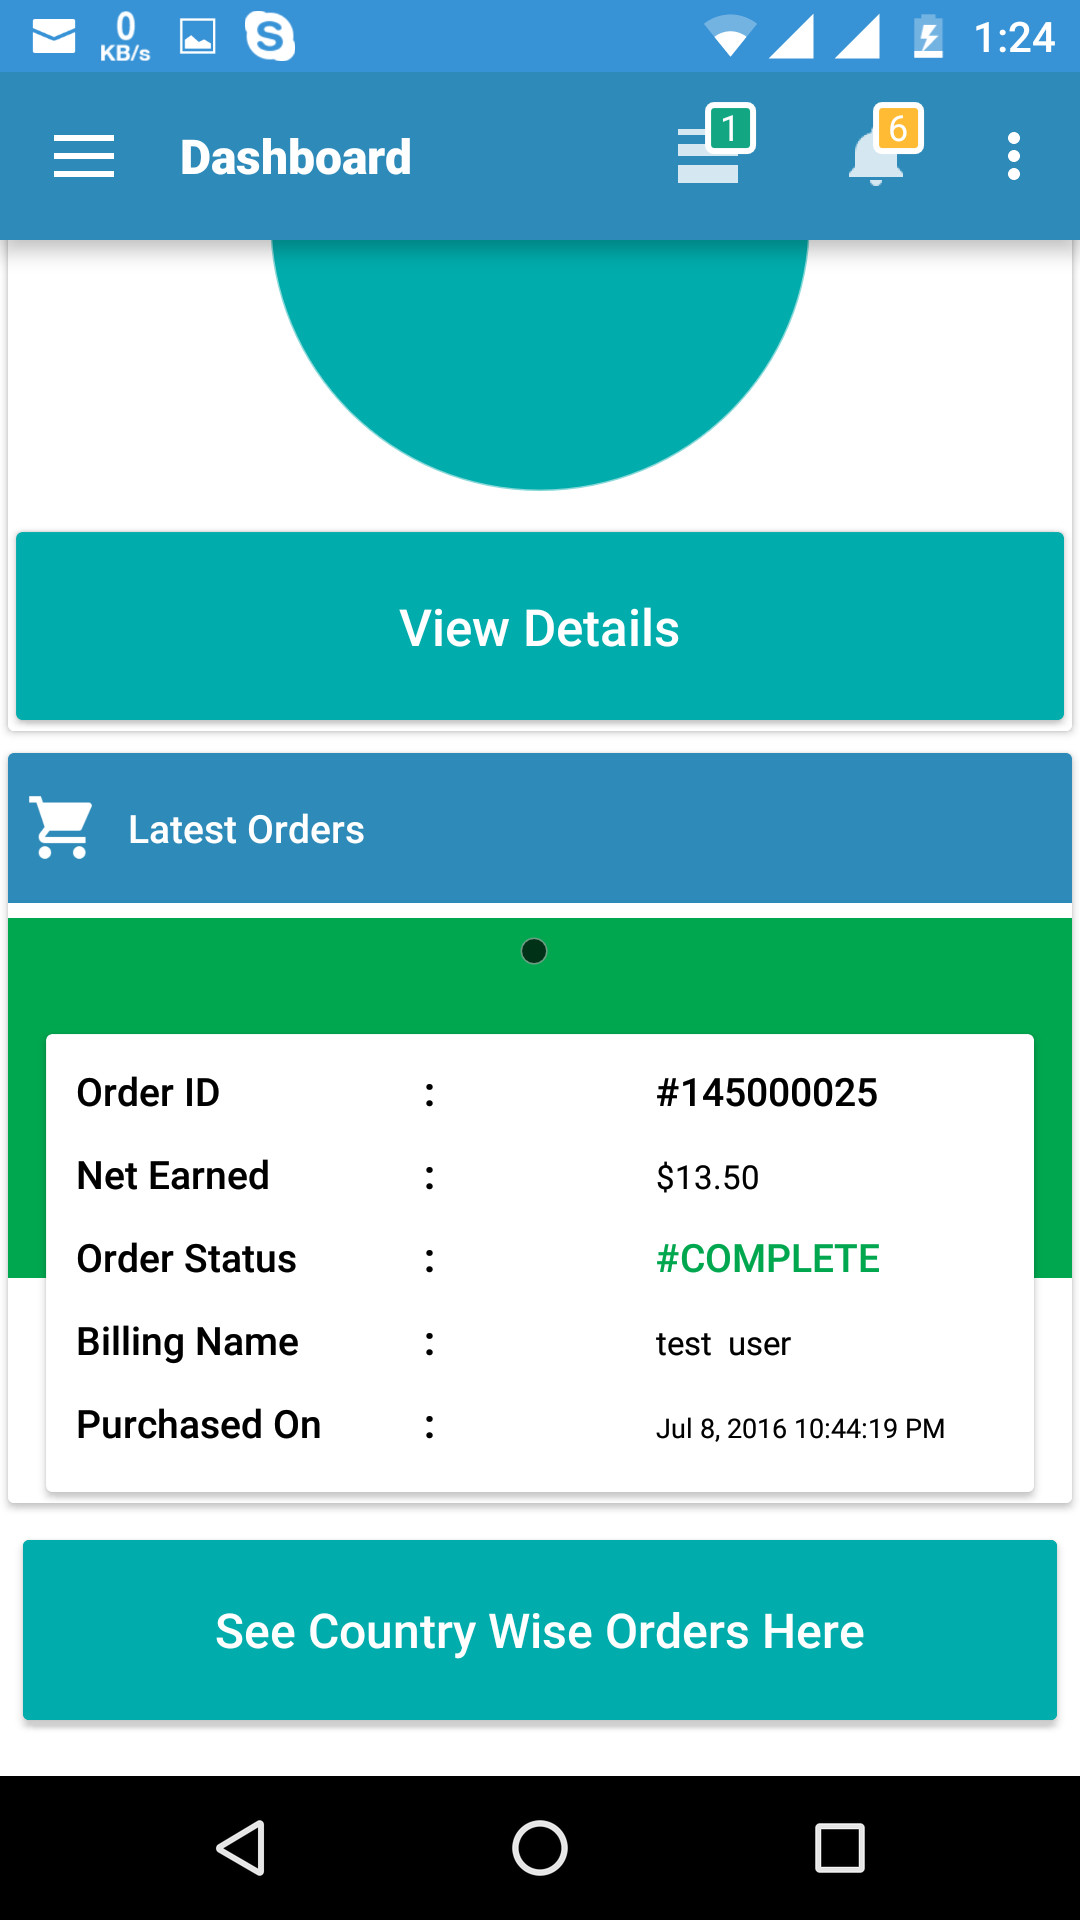
Vendor Dashboard
Multivendor Platinum APP allow vendor to have a quick look of their recent Orders, Total Earning, Pending Transfers, Product Approvals, Product Sales and Performance of Shop by Sales Analytic Graph, Country wise (Map)Sales Report.

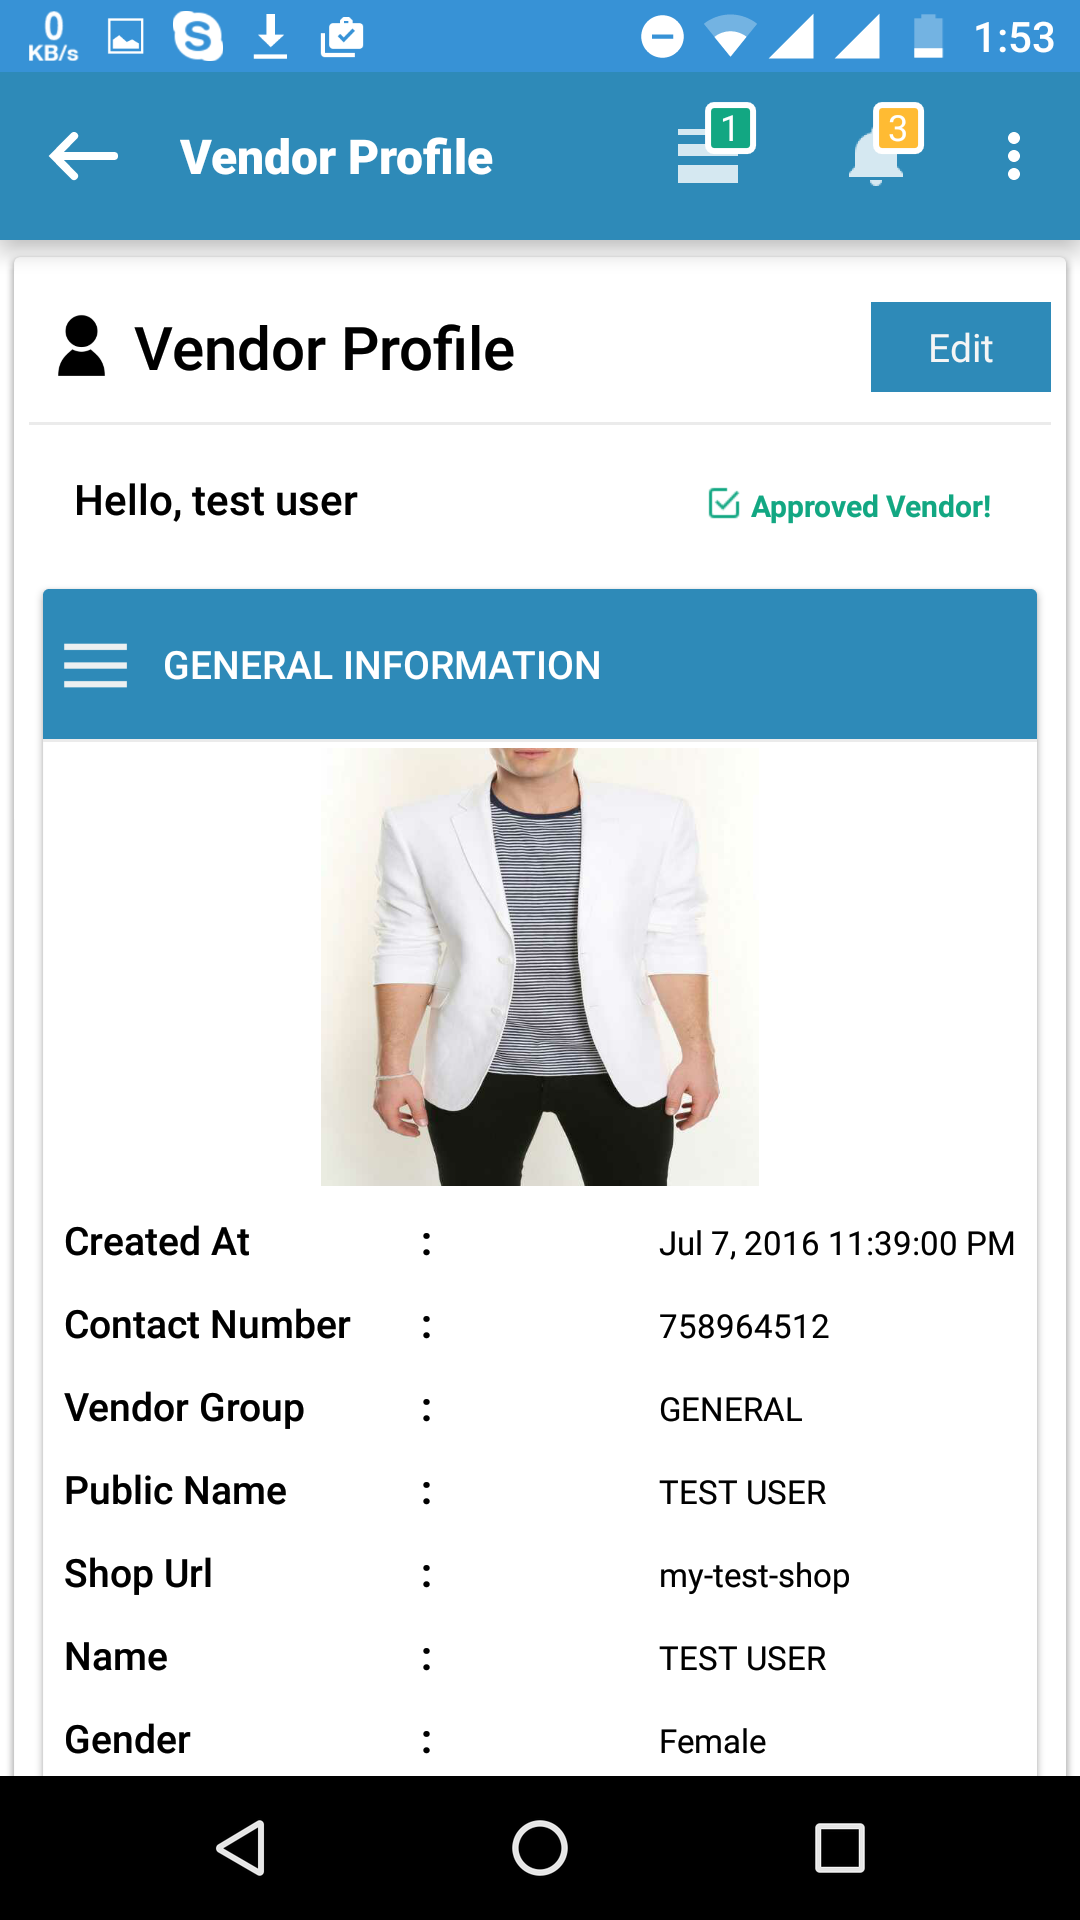
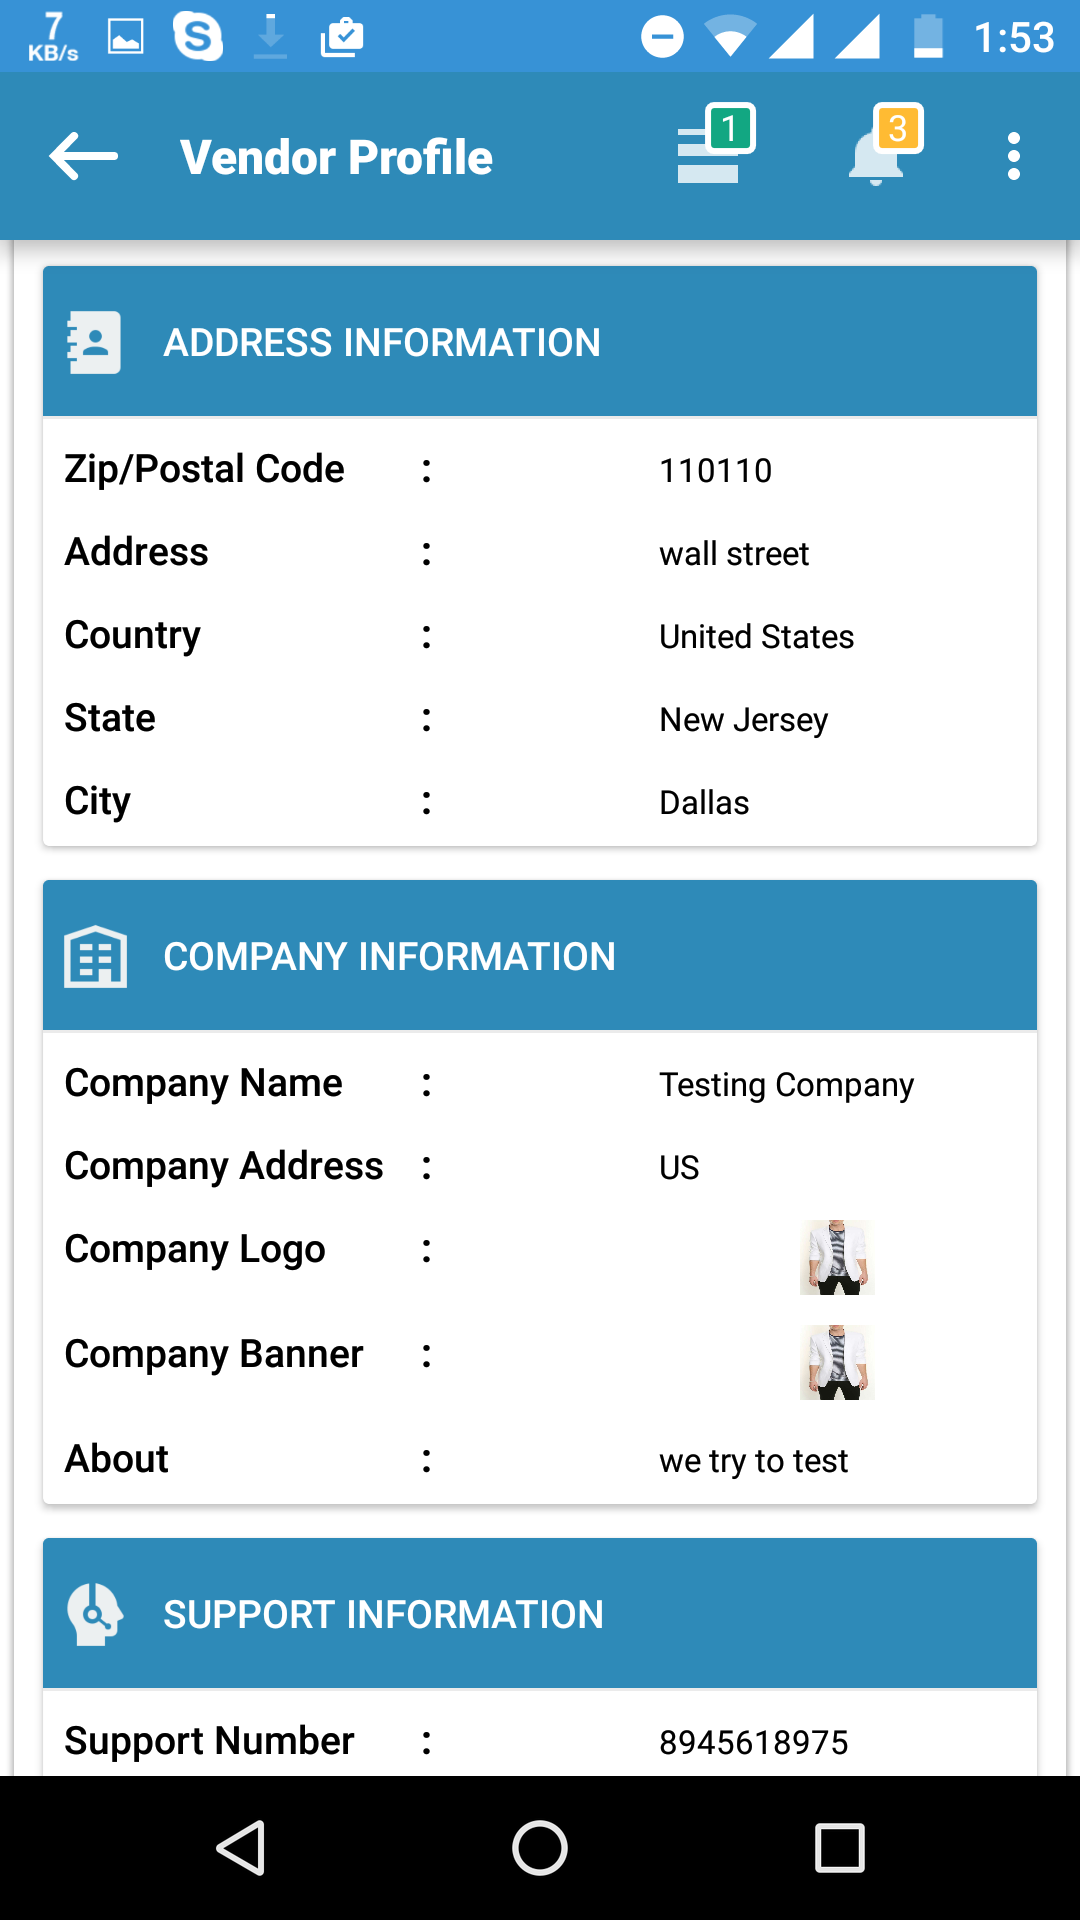
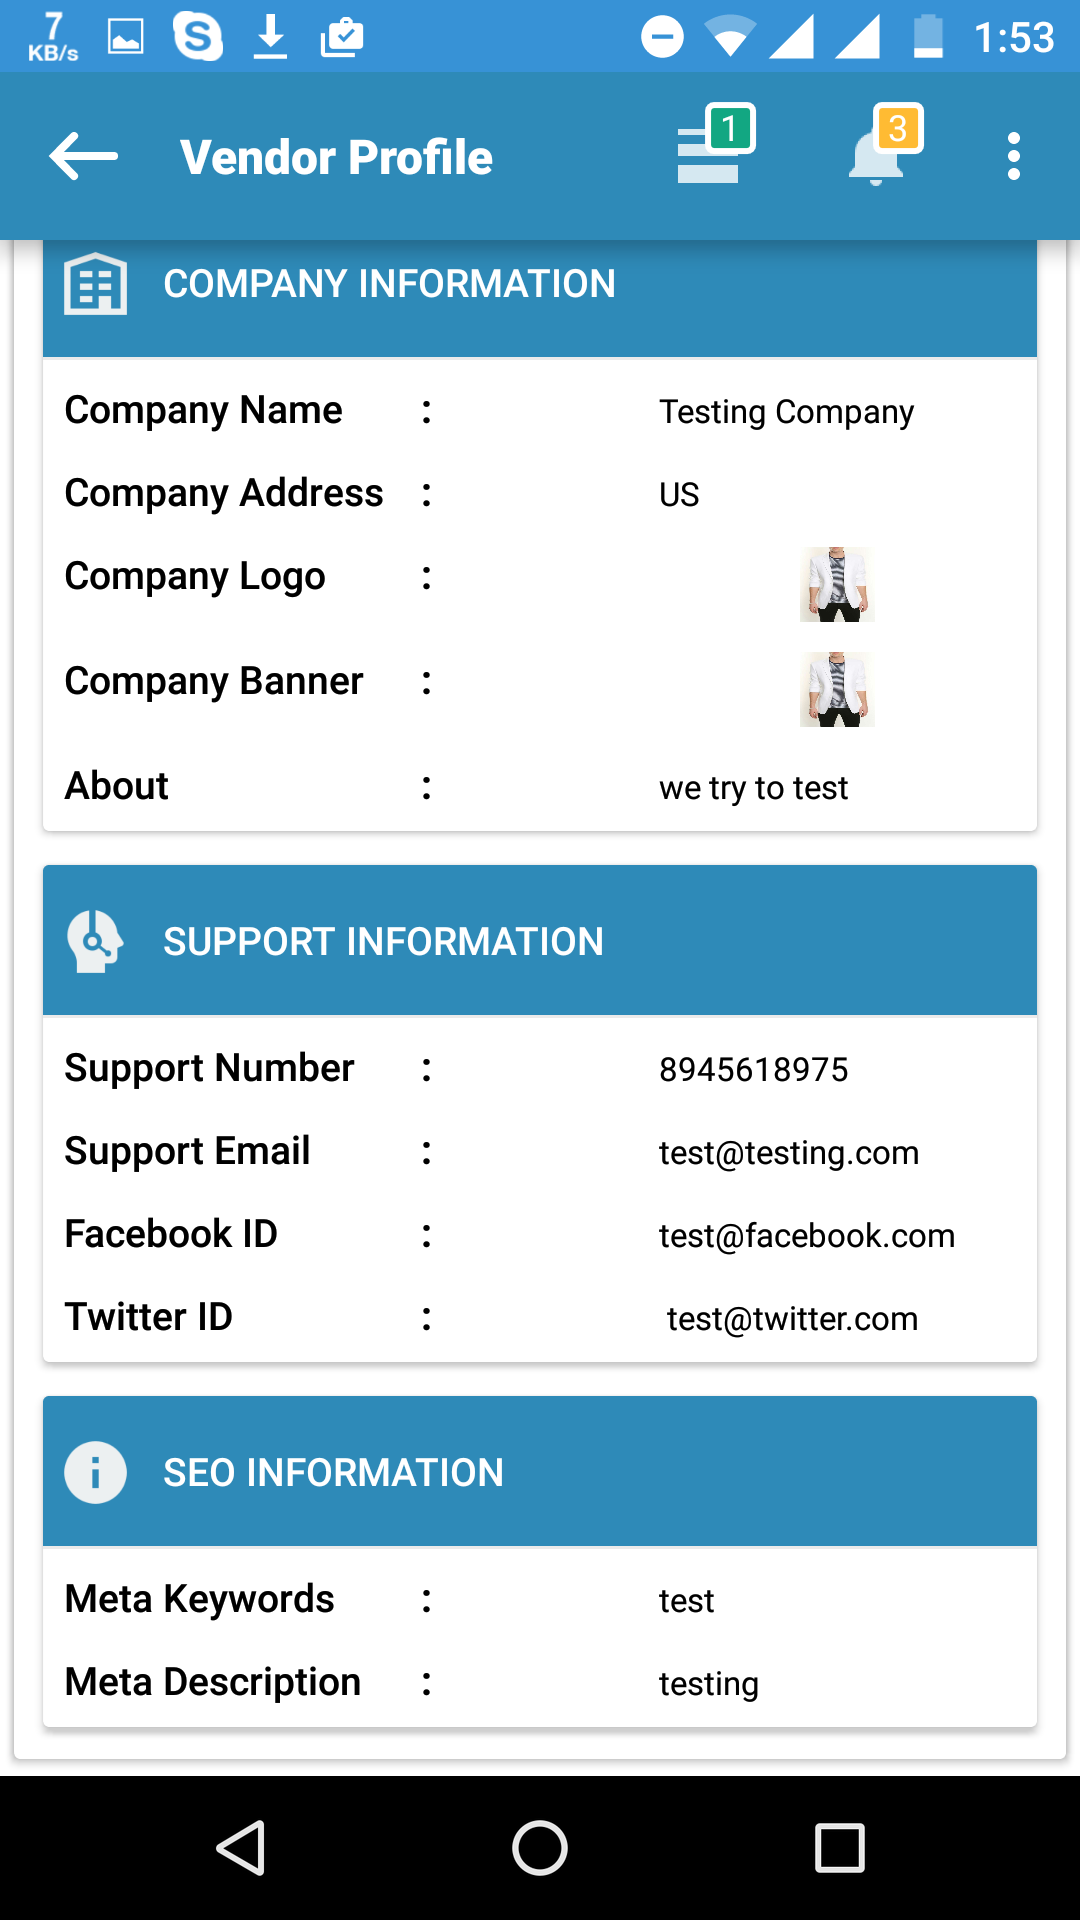
Vendor Profile
Multivendor Platinum APP allow vendor to update its profile. From this section vendor can update various information related to its store like vendor profile picture, company logo , company banner, meta information etc.
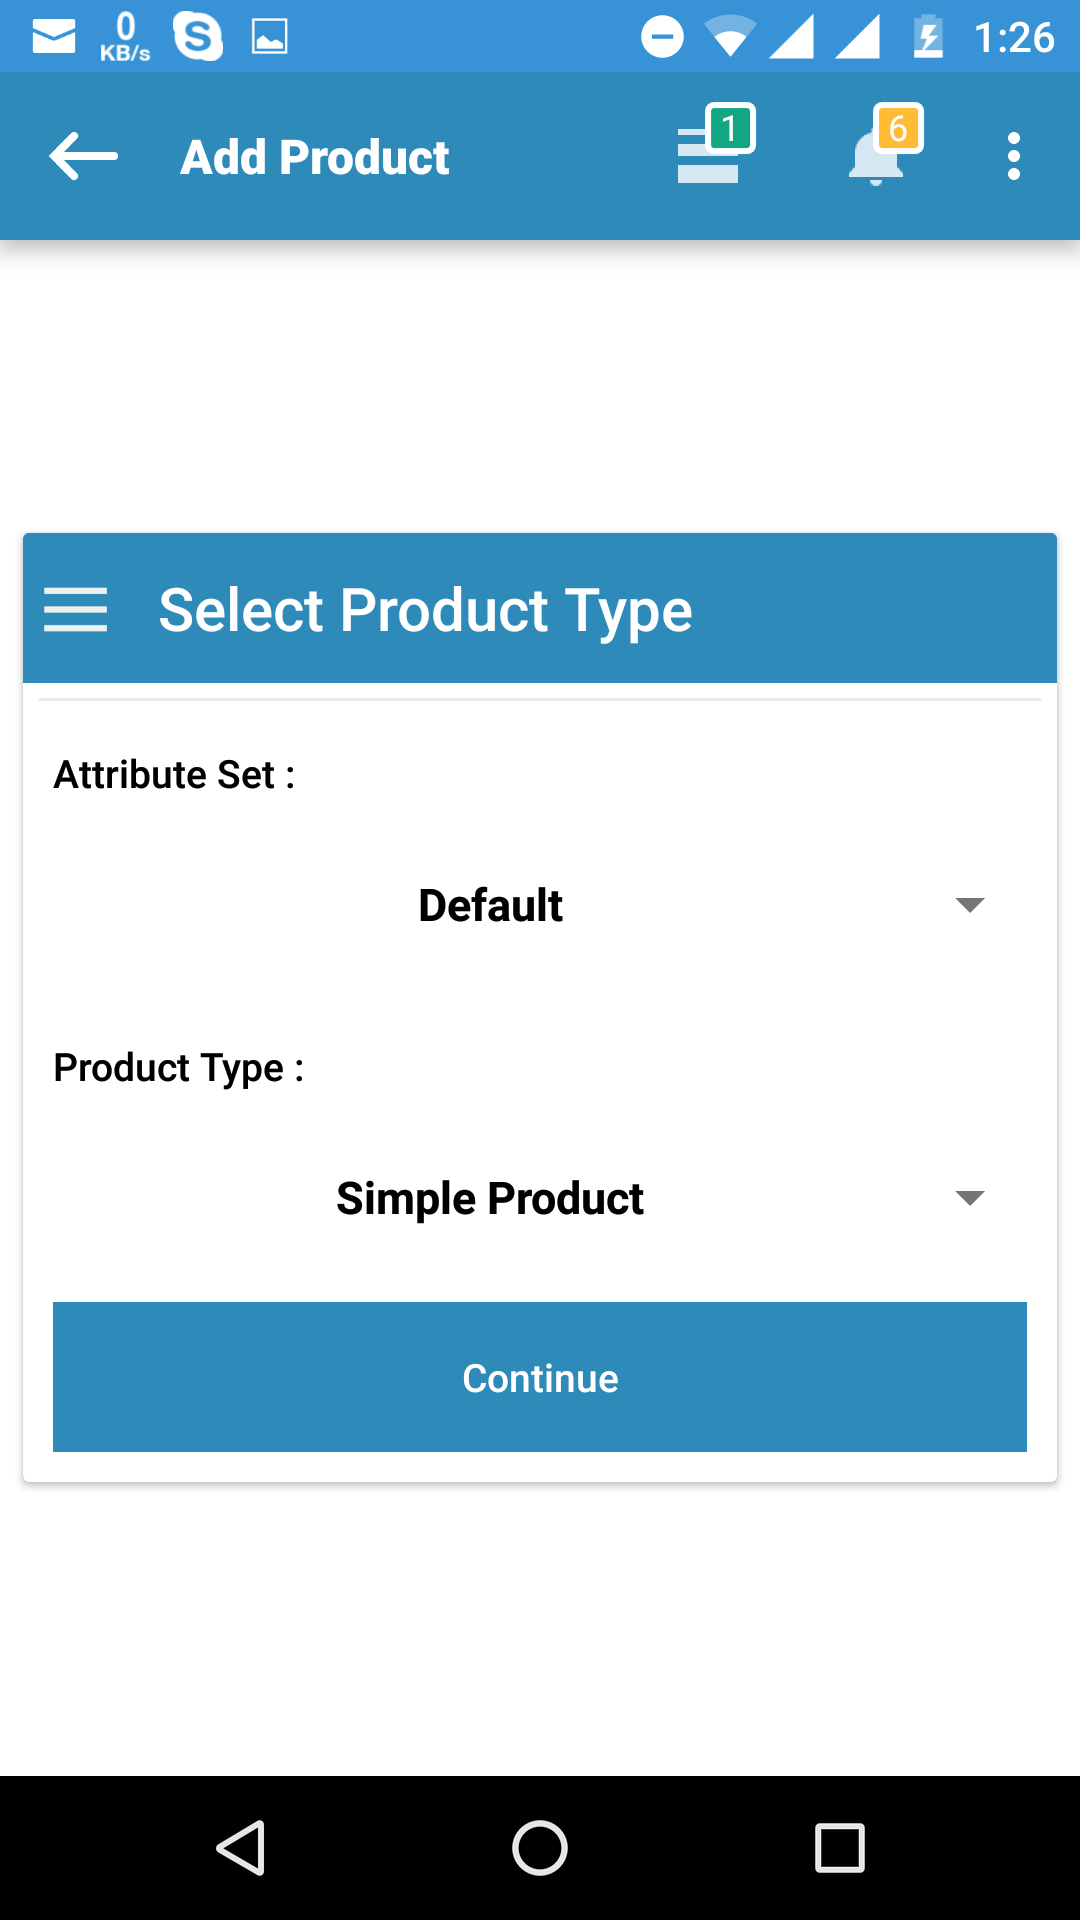
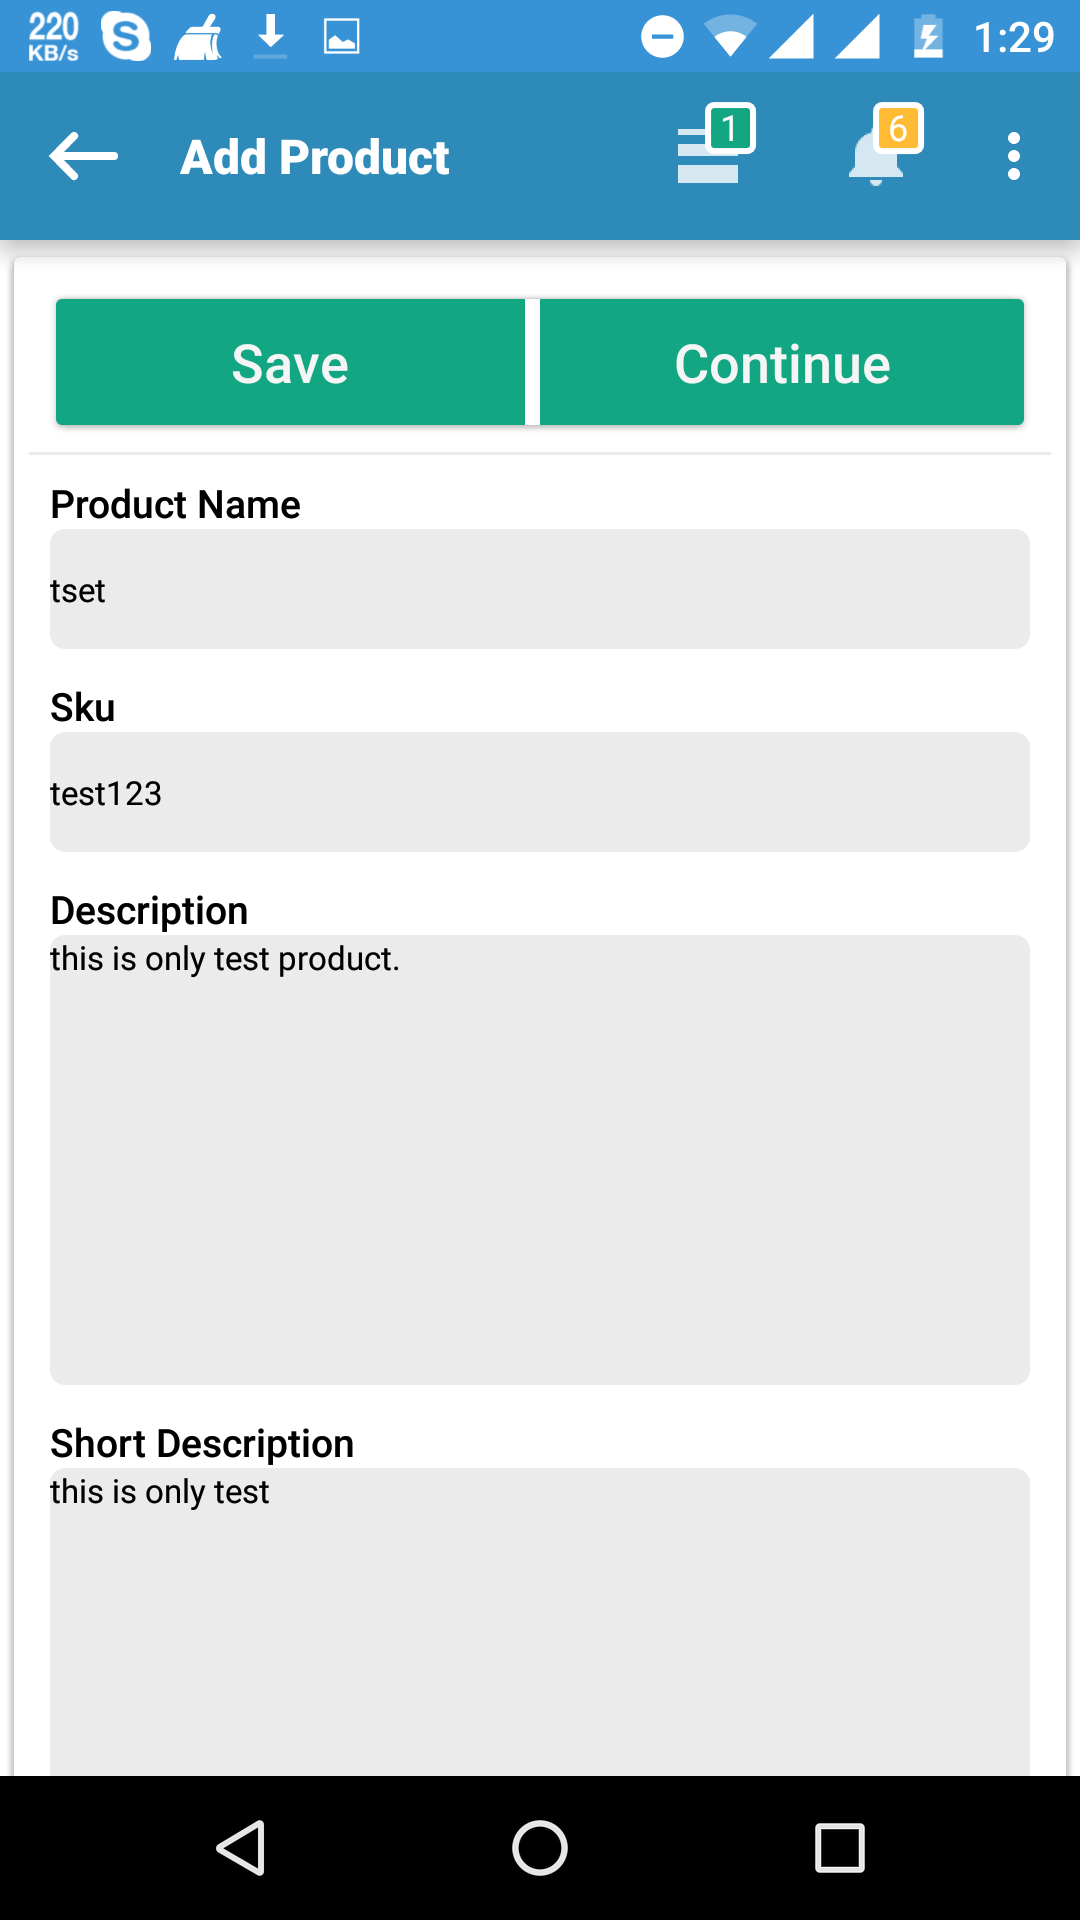
Create New Product
Multivendor Platinum APP is an enhanced version of basic app which provide support for all types of product except downloadable. Our platinum app also support custom option, related products, cross-sell products, up-sell product. When vendor clicks on new product links vendor will see screen as in below image.
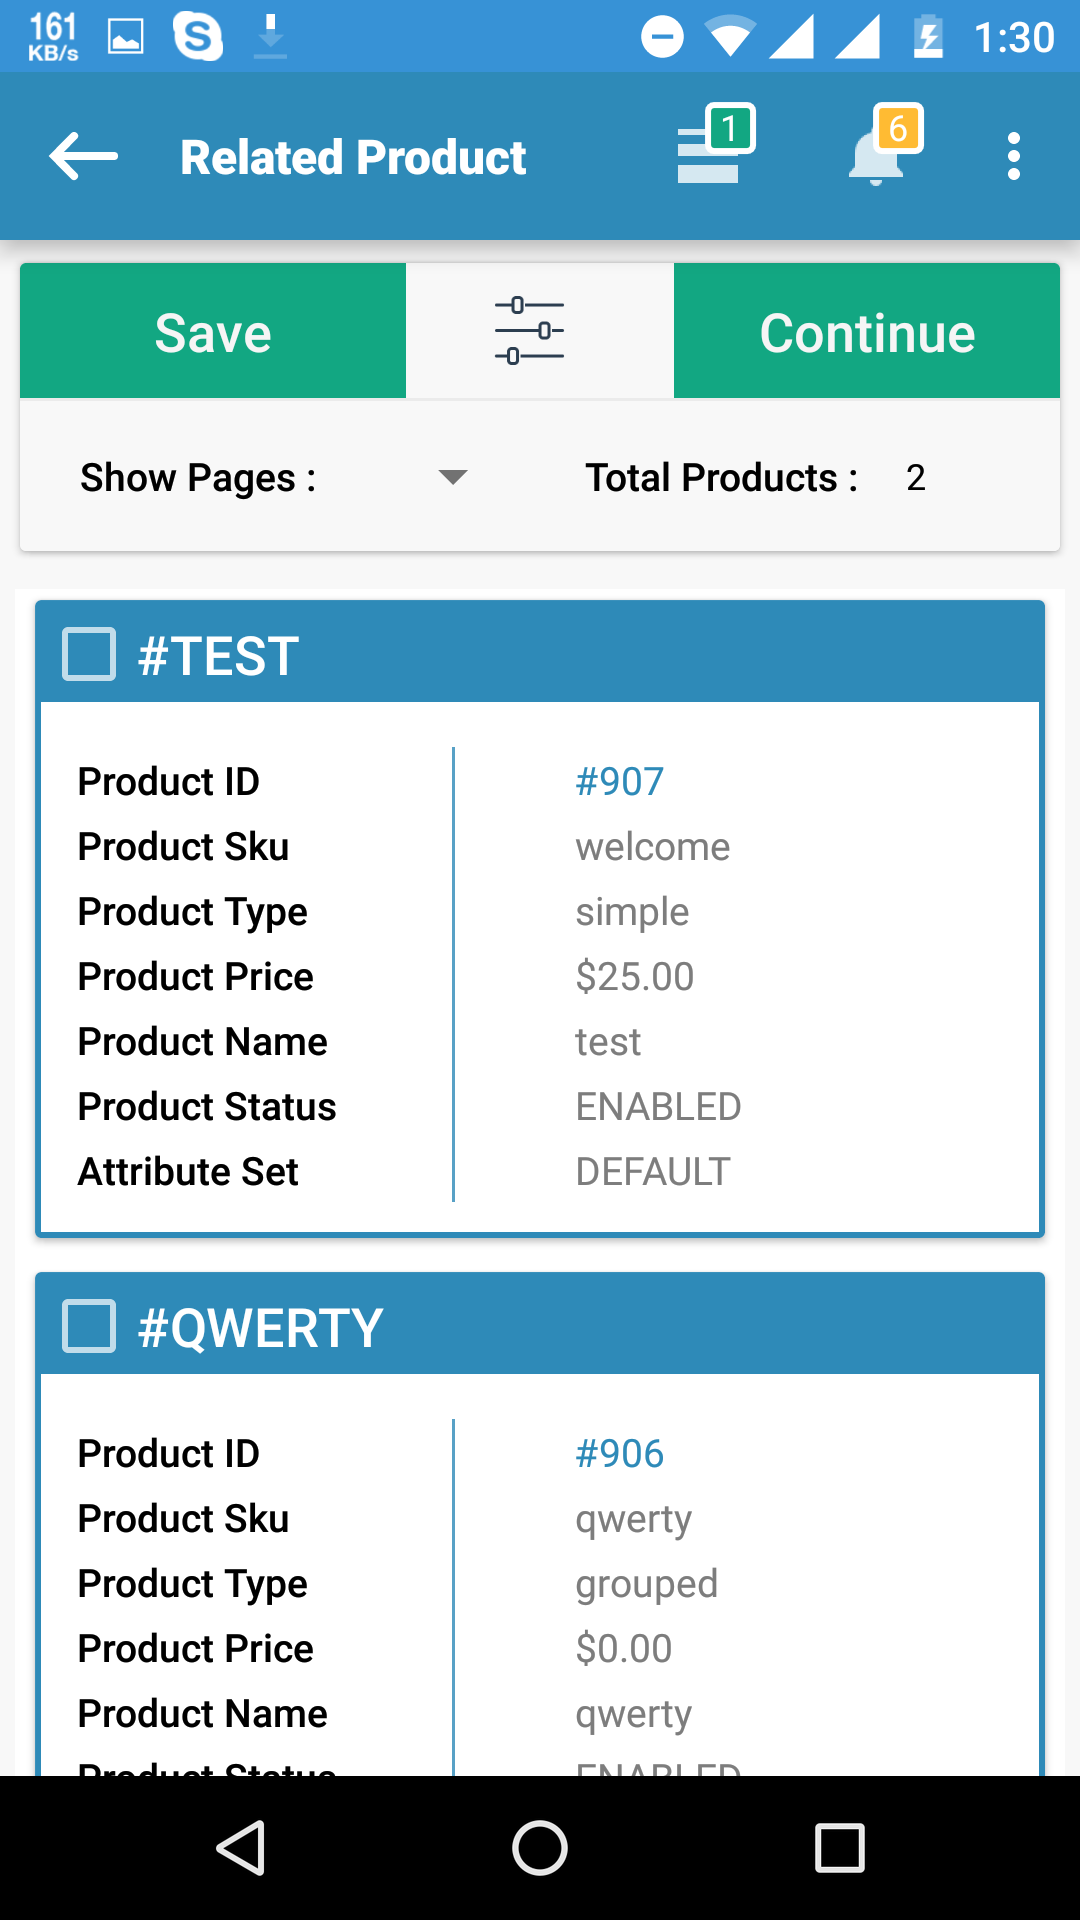
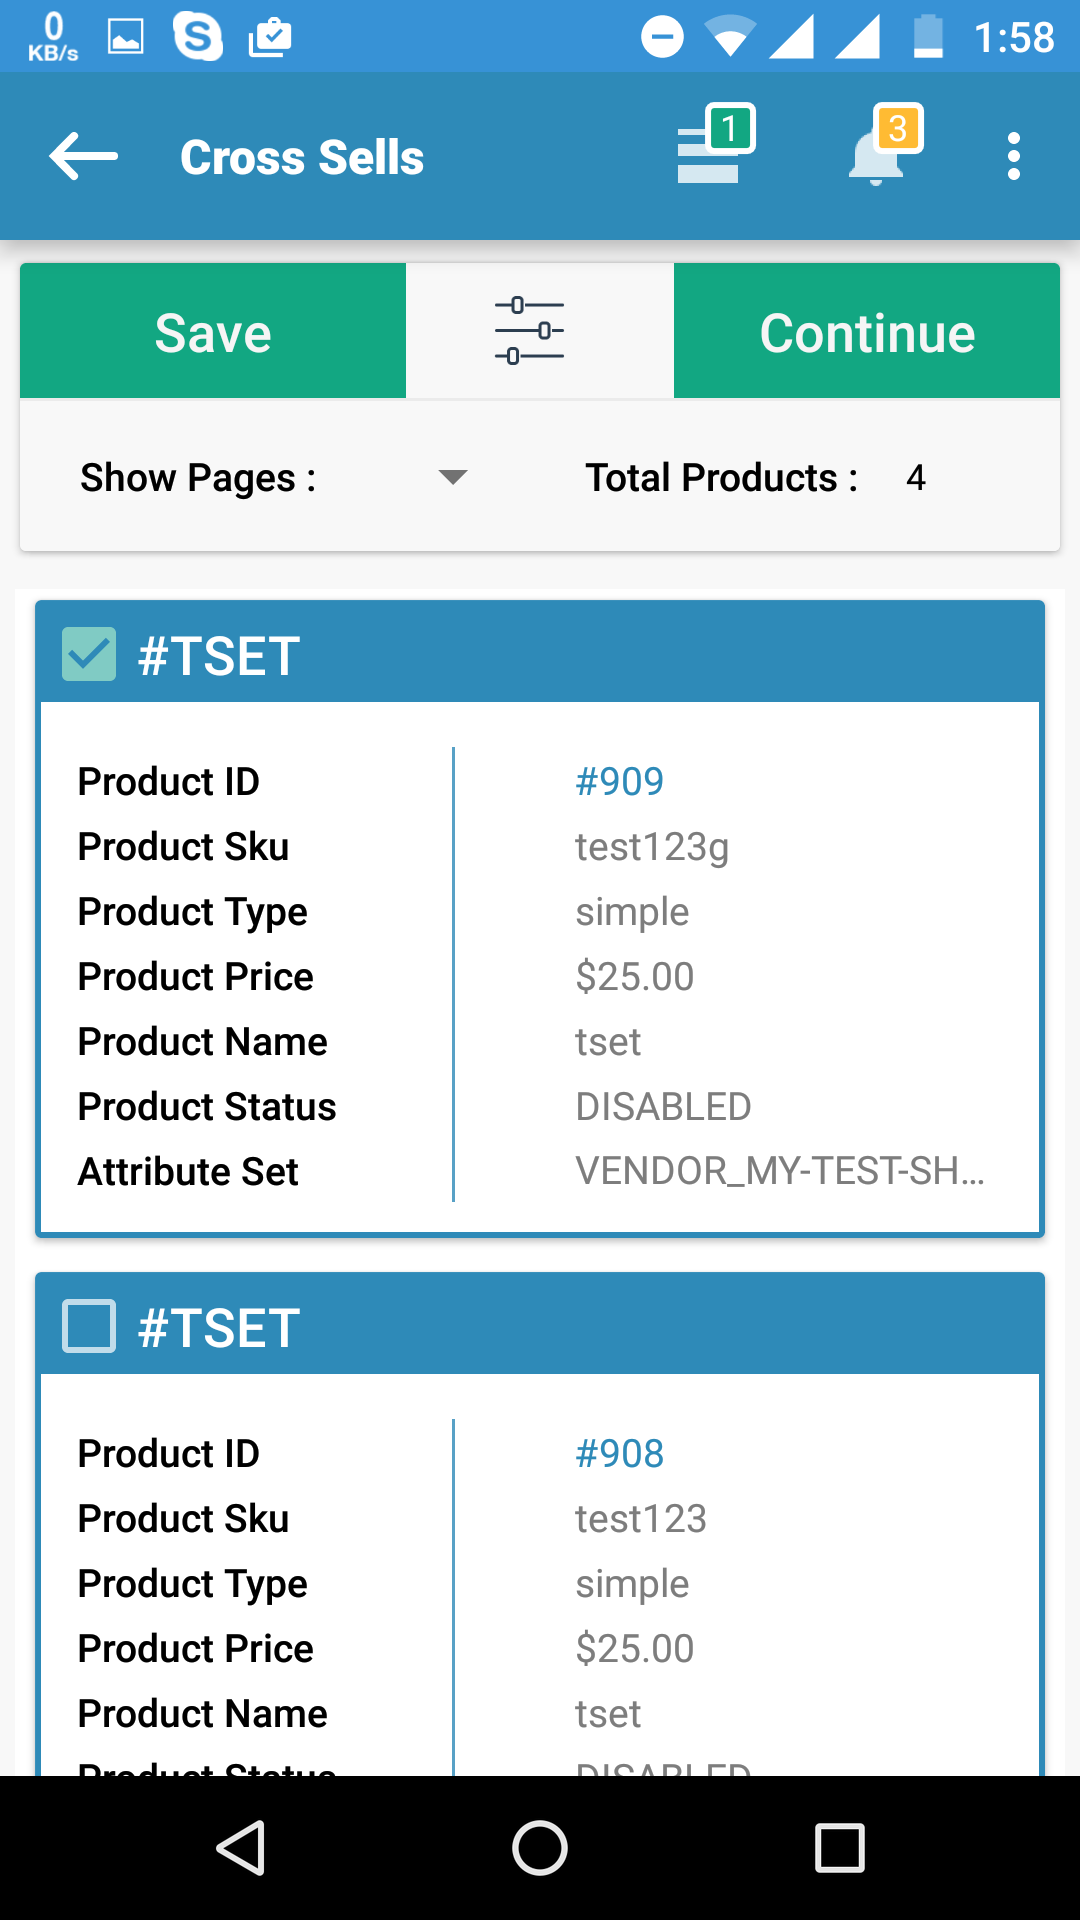
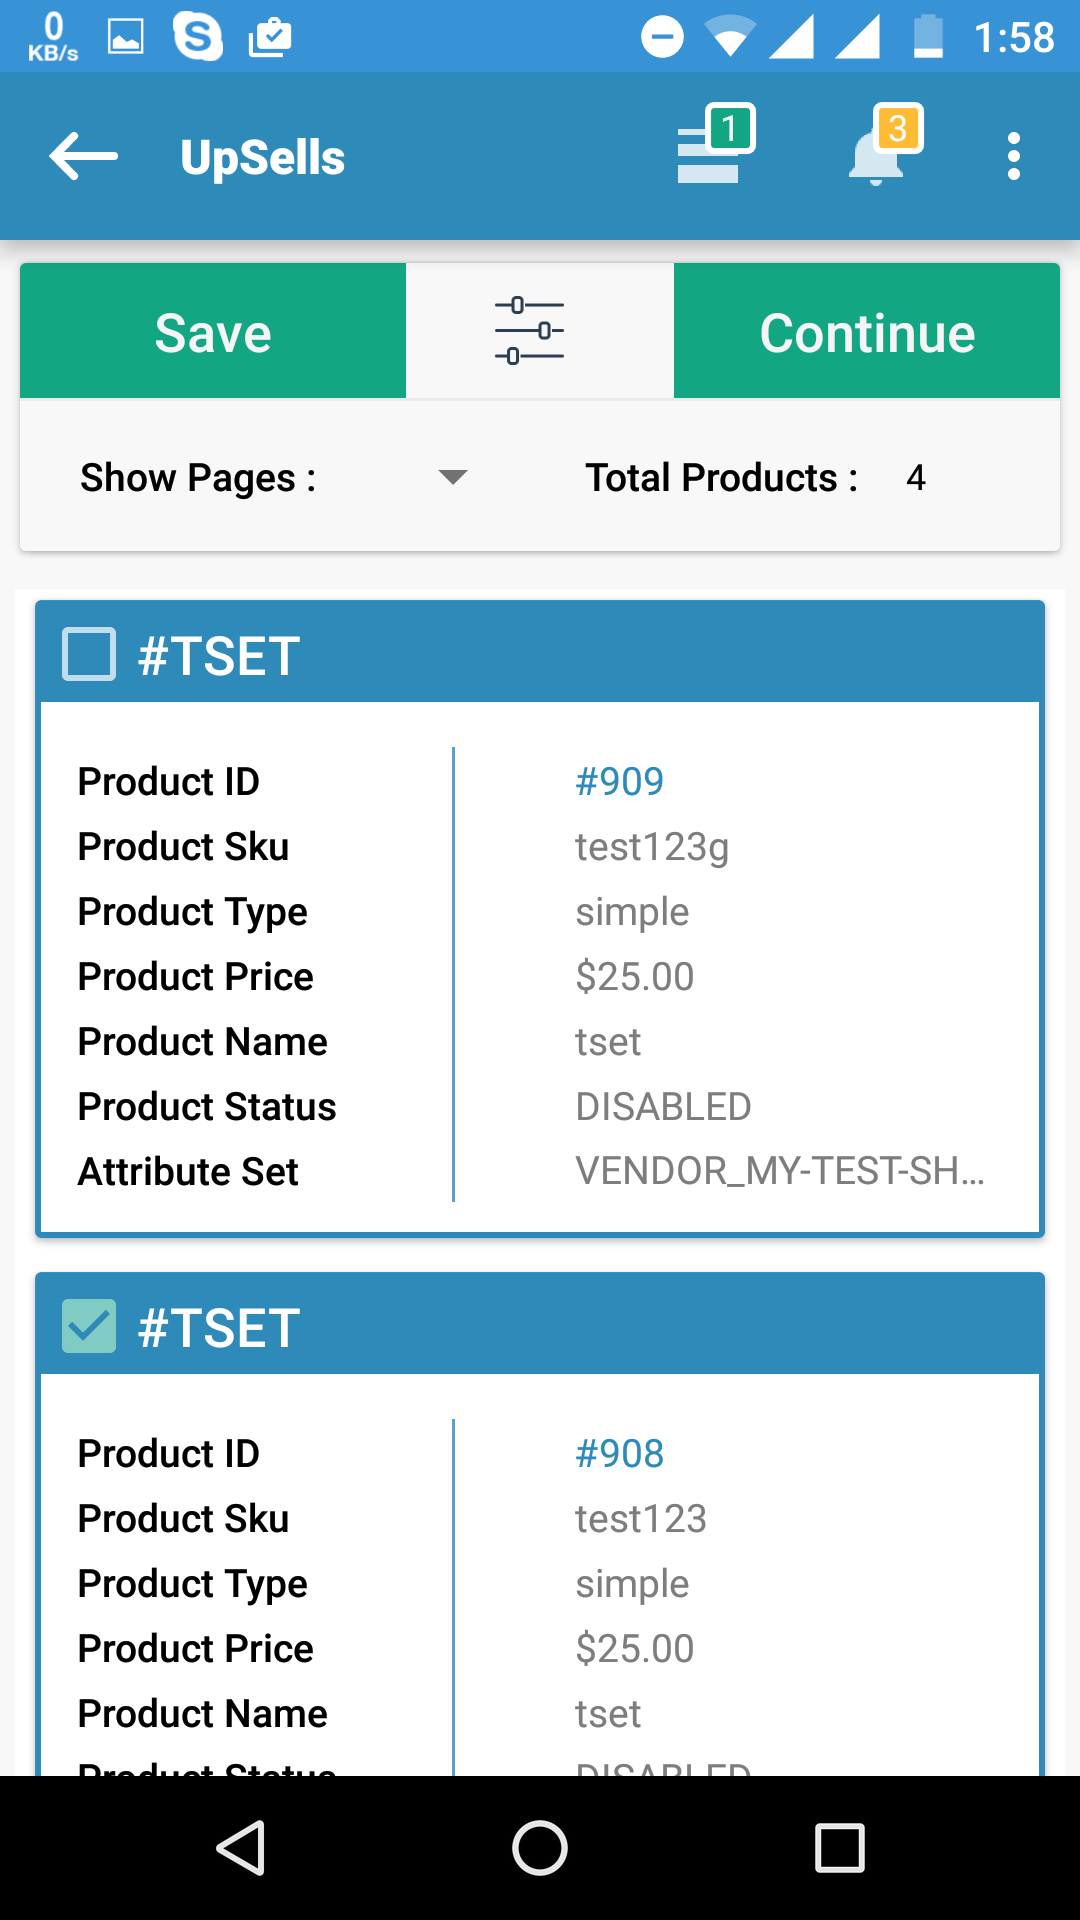
Related Products, Up-sells Products and Cross-sells Products
Vendors can add their products in cross sells, upsells and related sections of Magento to increase their sales and provide options for customers to look for other products from the same Vendor. Website Admin has the authority to enable/disable these features from the Admin Panel.
Assigning related product screen looks as in below image. You can assign related product by selecting product from grid.
Assigning crossell product screen looks as in below image. You can assign crossell product by selecting product from grid.
Assigning upsell product screen looks as in below image. You can assign upsell product by selecting product from grid.
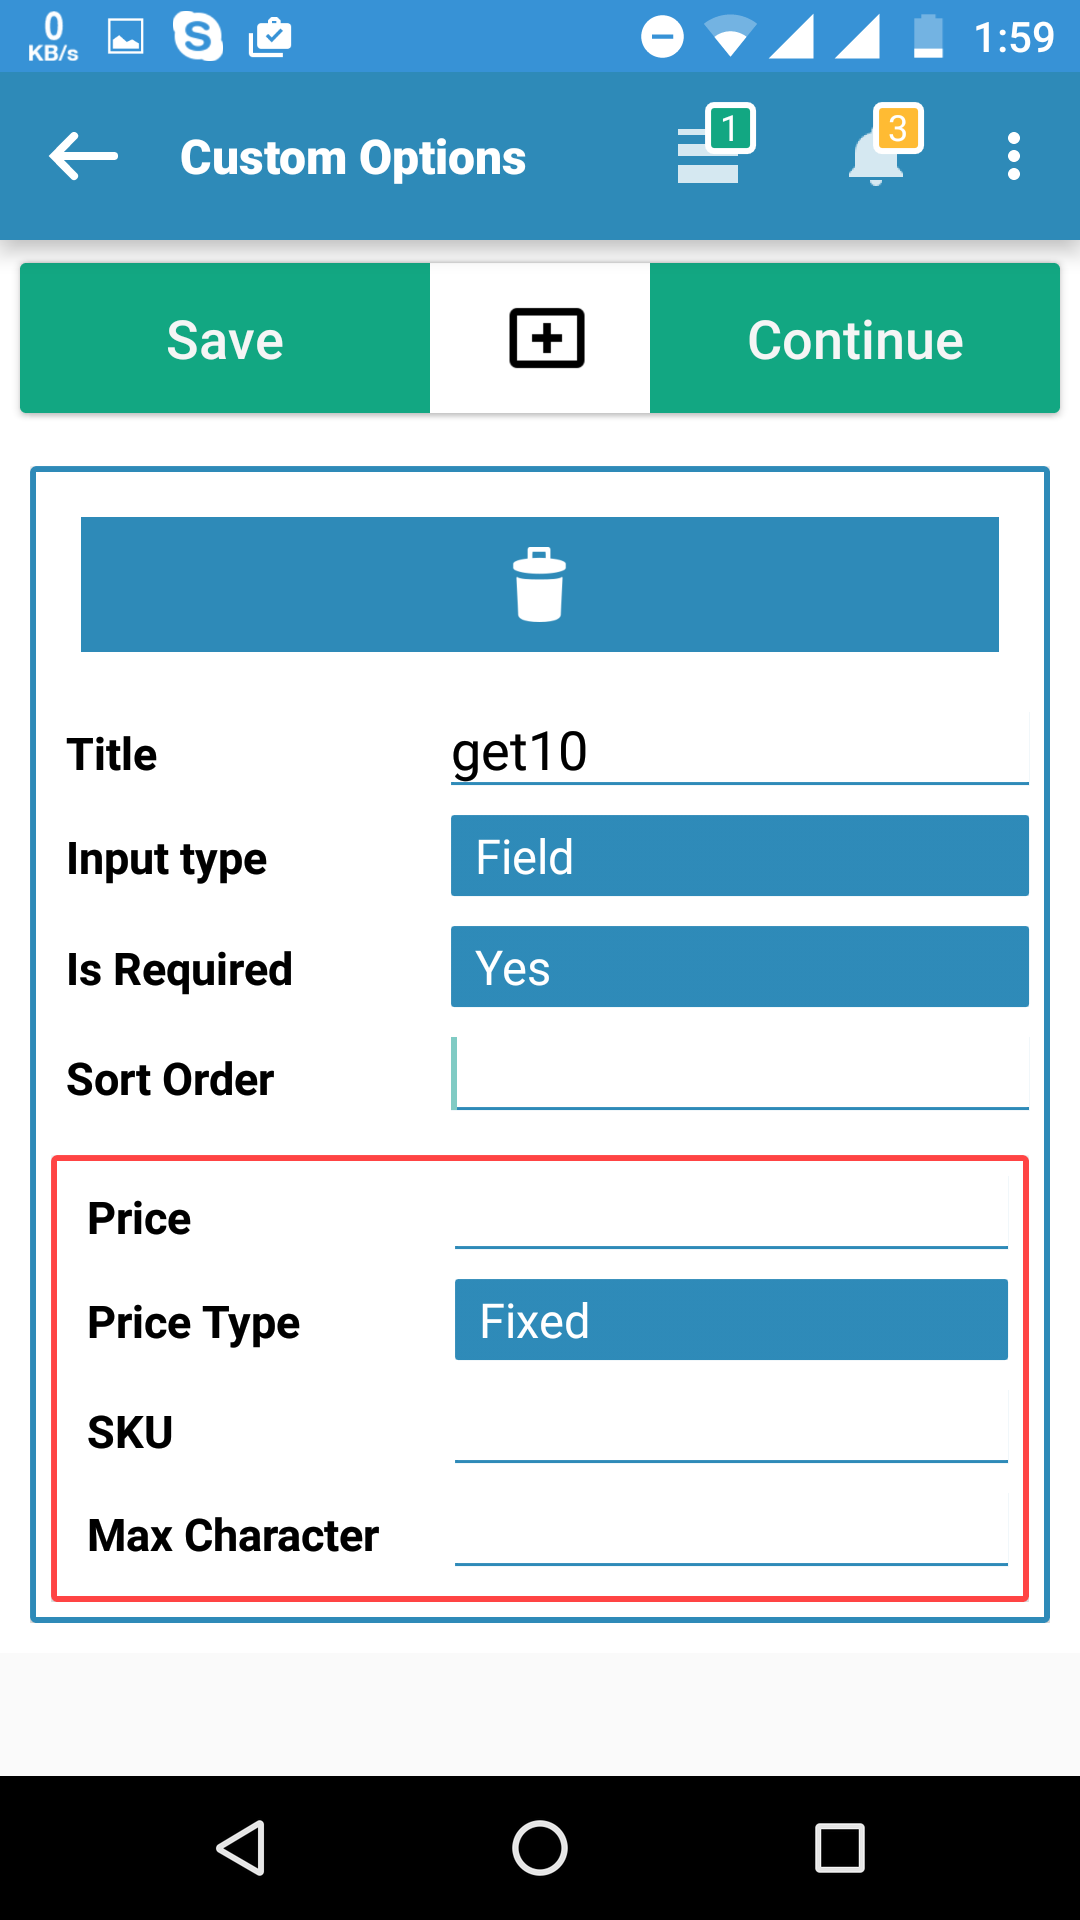
Product Custom Options
Product Custom Options provides a convenient way for the vendor to add different options available for a product like colors, sizes etc. All the custom option types are supported in Default Magento. Website Admin can Enable/Disable this feature from the Configuration Settings in the admin panel.
Adding Custom option screen looks as in below image.
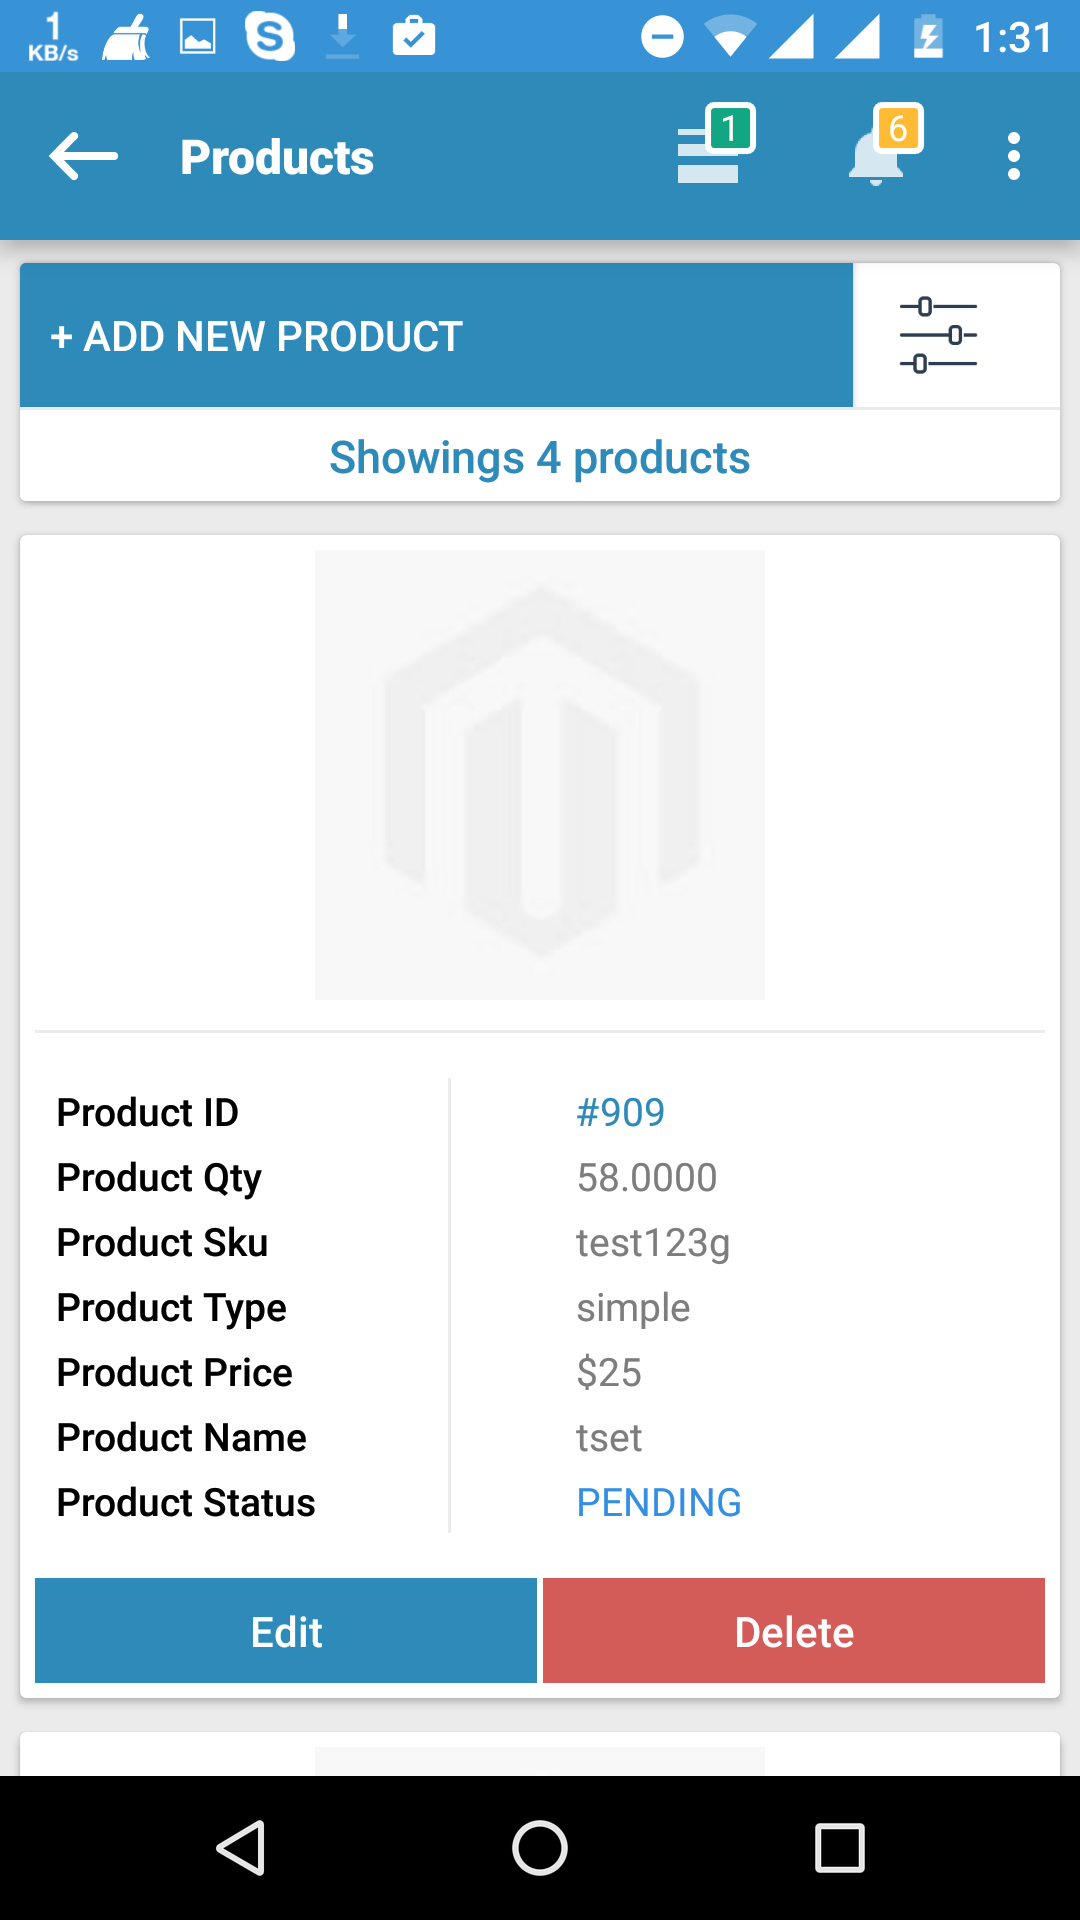
Manage Product
Multivendor Platinum APP allow vendor to manage product from their vendor panel. Manage Product list's all the product which vendor creates whether its approved, pending or not approved. Vendor can also update its product information by clicking on product which will redirect him to product edit page which is same as product creation form with all the value prefield with respective product data. Manage Product Screen looks as in below image.
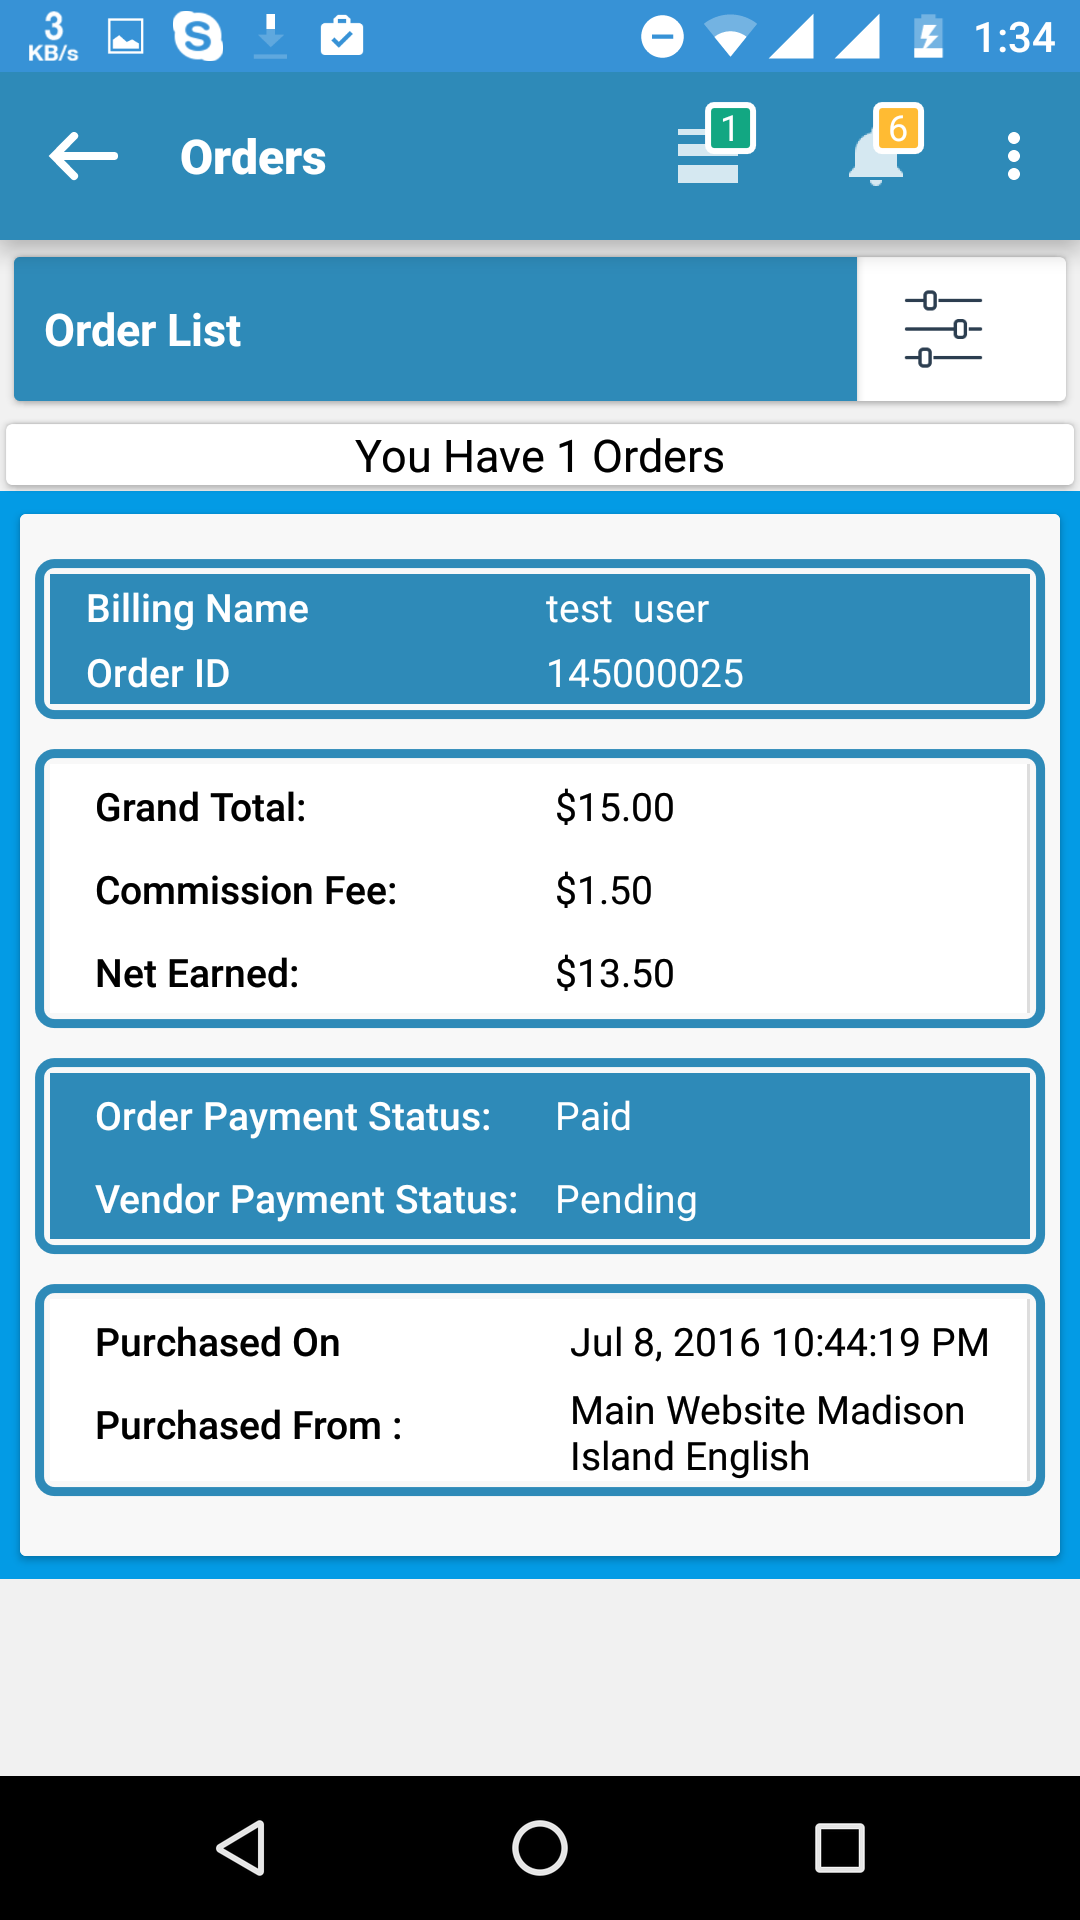
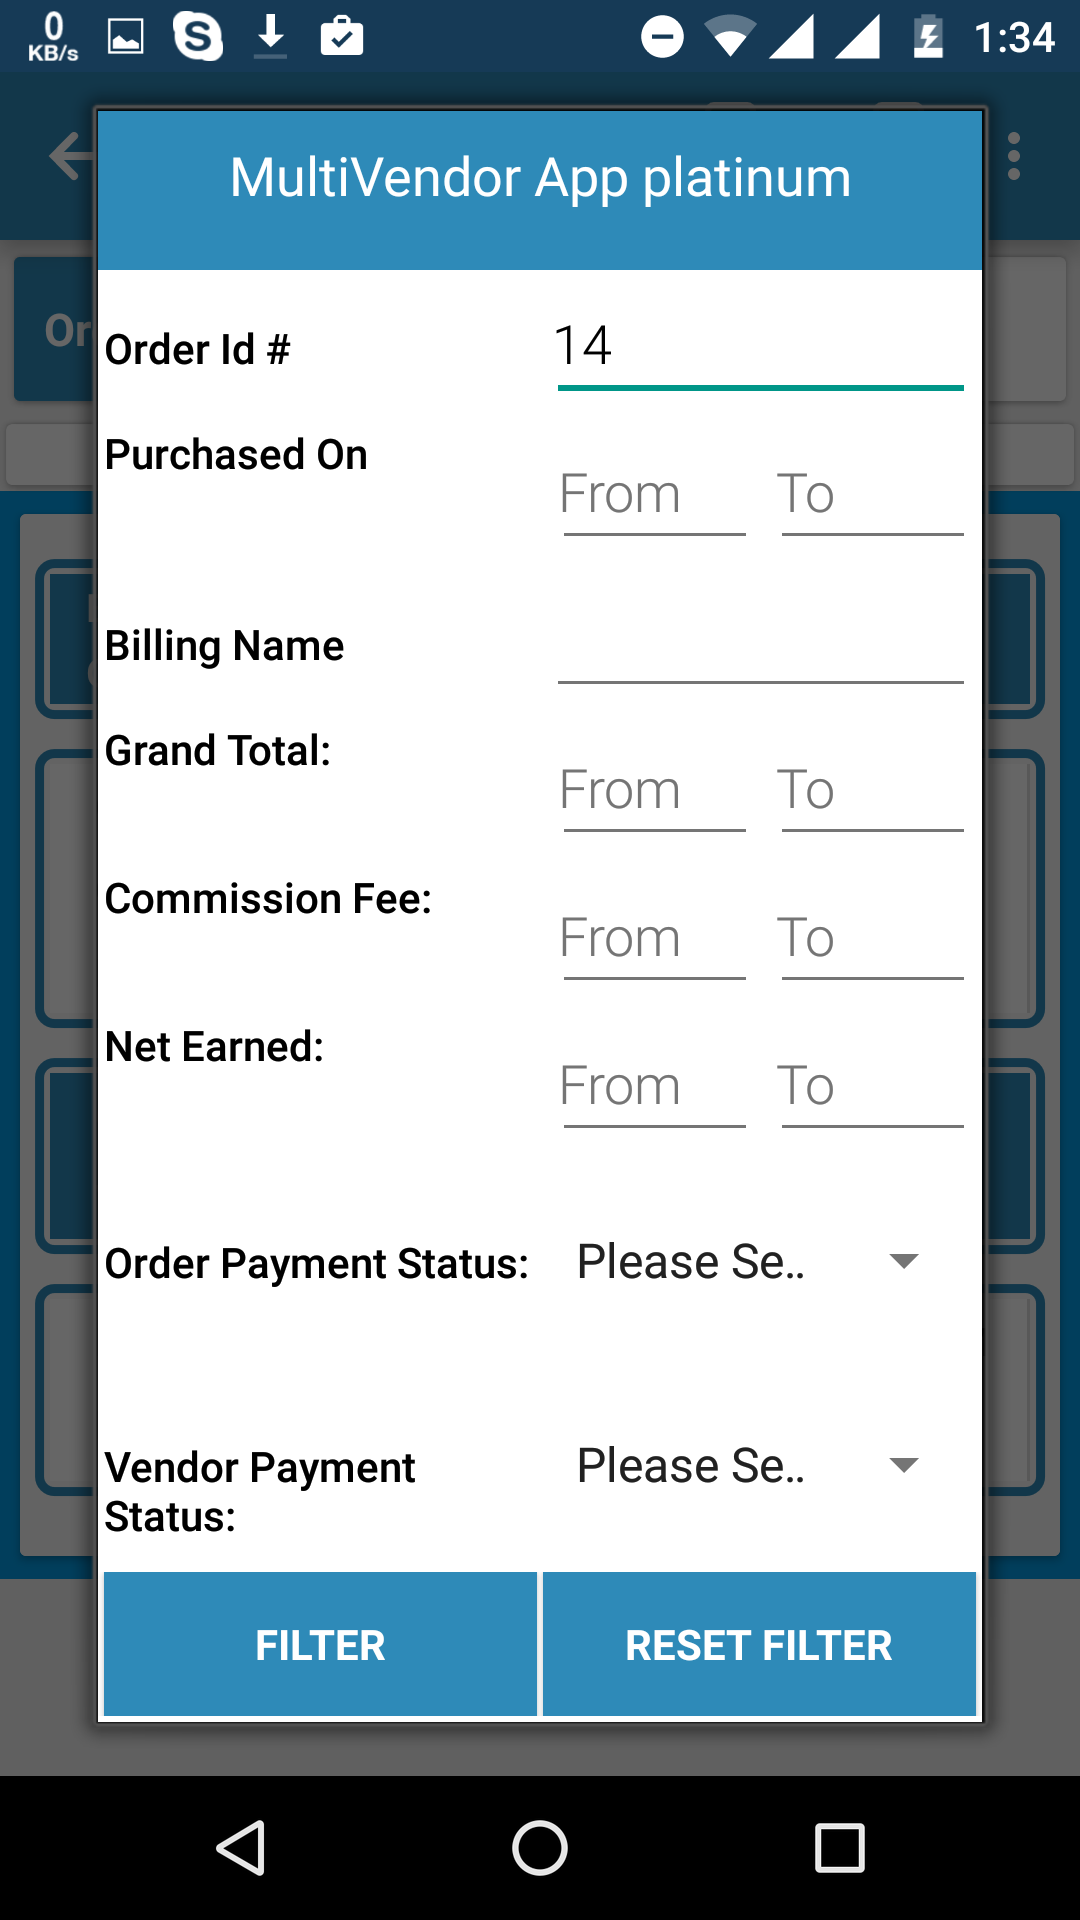
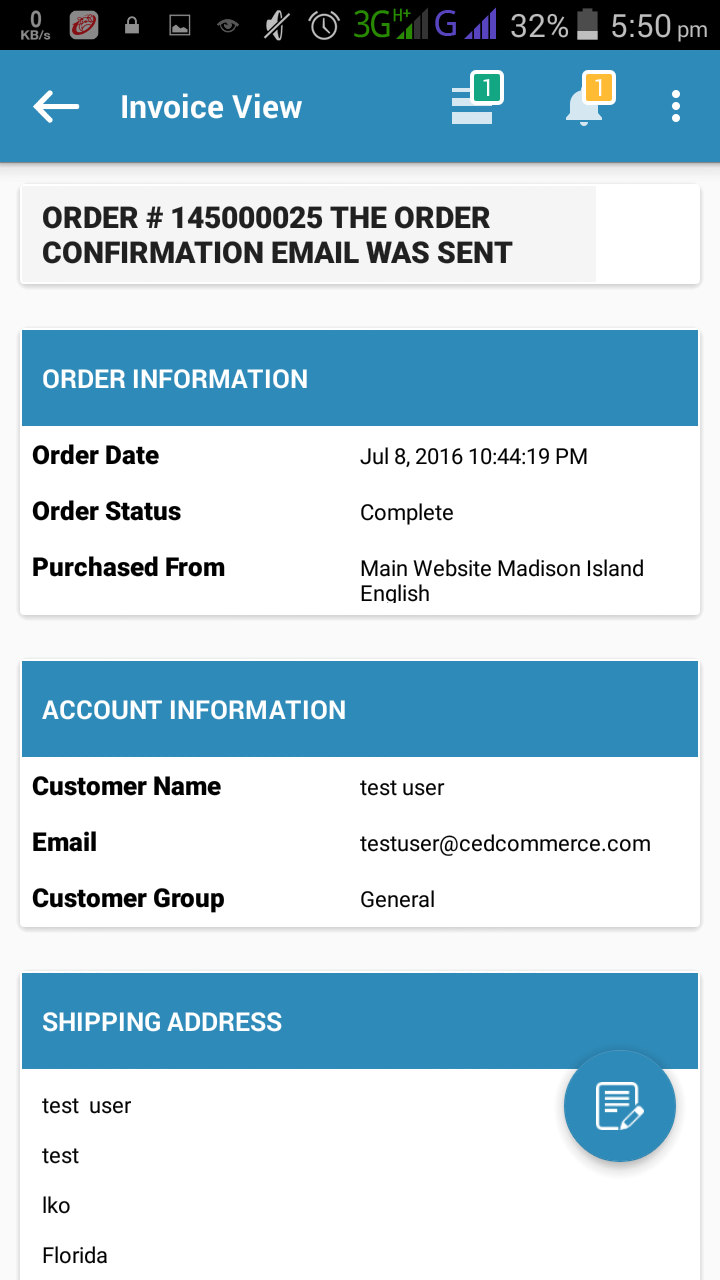
Manage Order
Multivendor Platinum APP allow vendor to view orders with detailed report including tax, discounts and multiple currencies support. The vendor can easily manage orders from his vendor panel from Manage Orders page which displays the list of all the vendor orders.
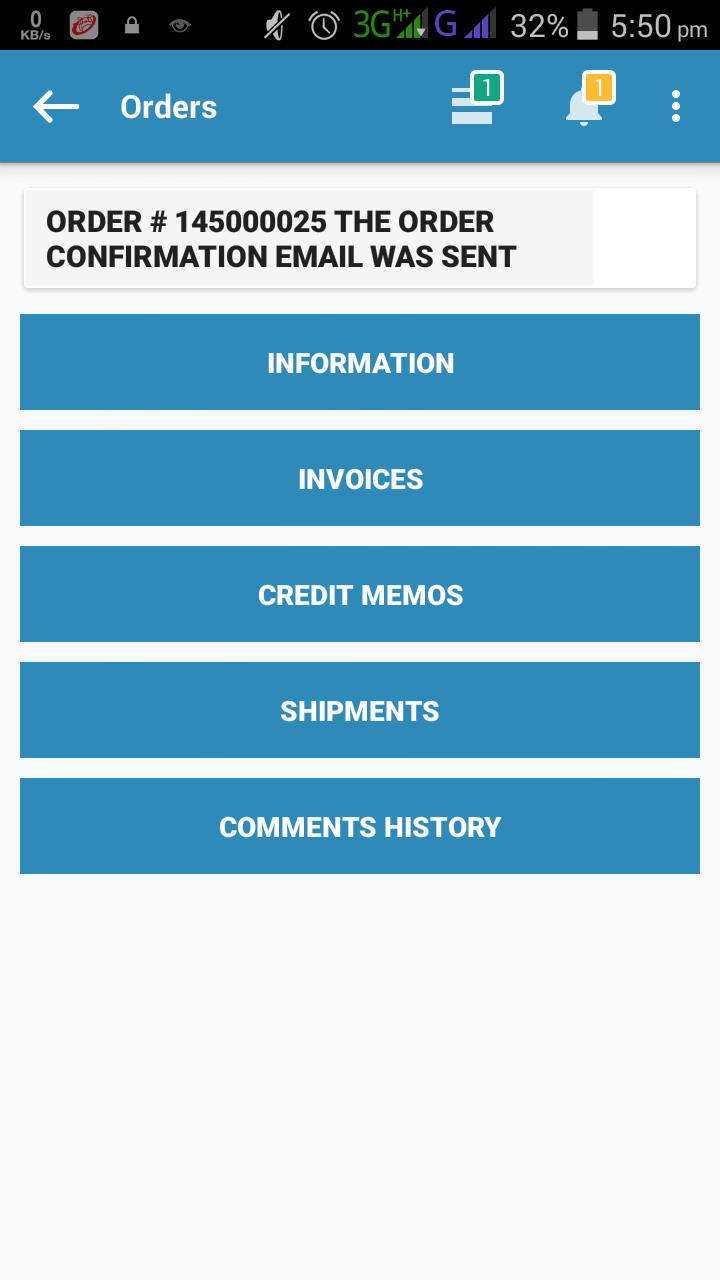
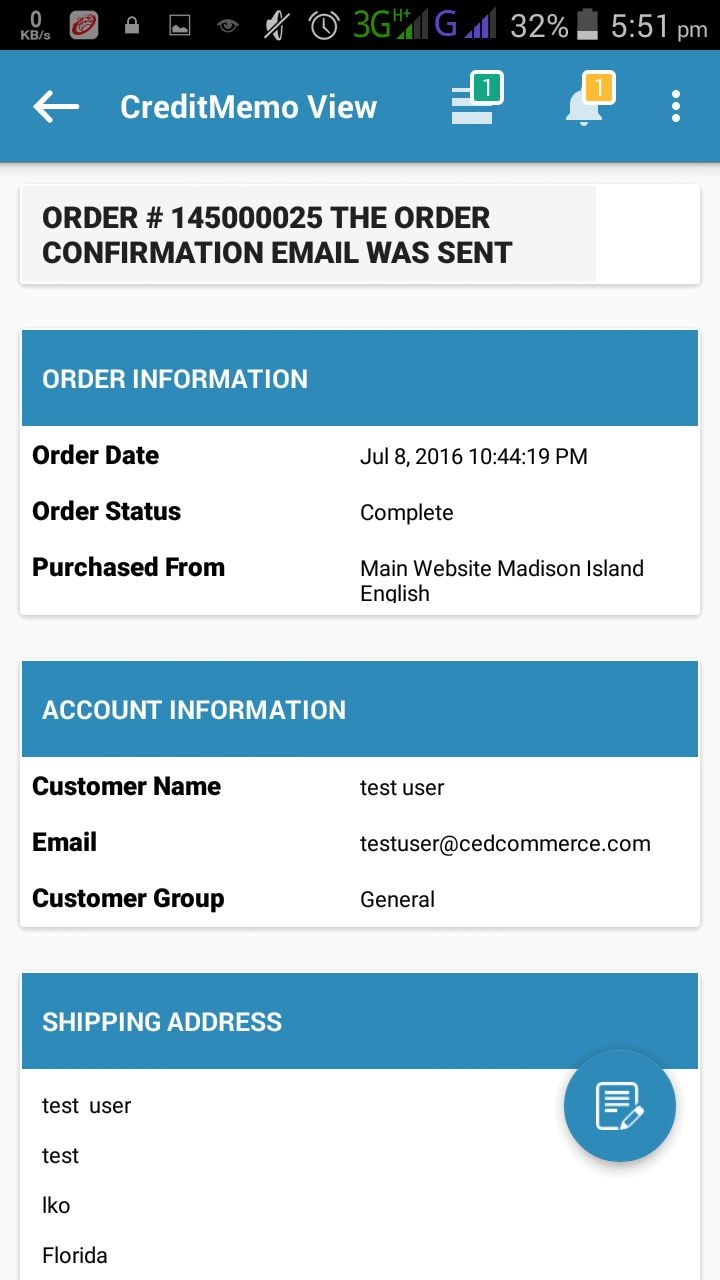
Manage Invoice
Multivendor Platinum APP allow vendor to view invoice with detailed report including tax, discounts, tracking information and multiple currencies support. The vendor can easily manage invoices from his vendor panel from Manage Invoice page which displays the list of all the vendor invoices.

Manage Shipment
Multivendor Platinum APP allow vendor to view shipment with tracking information. The vendor can easily manage shipment from his vendor panel from Manage Shipment page which displays the list of all the vendor orders shipment. This section also allow vendor to add tracking info.
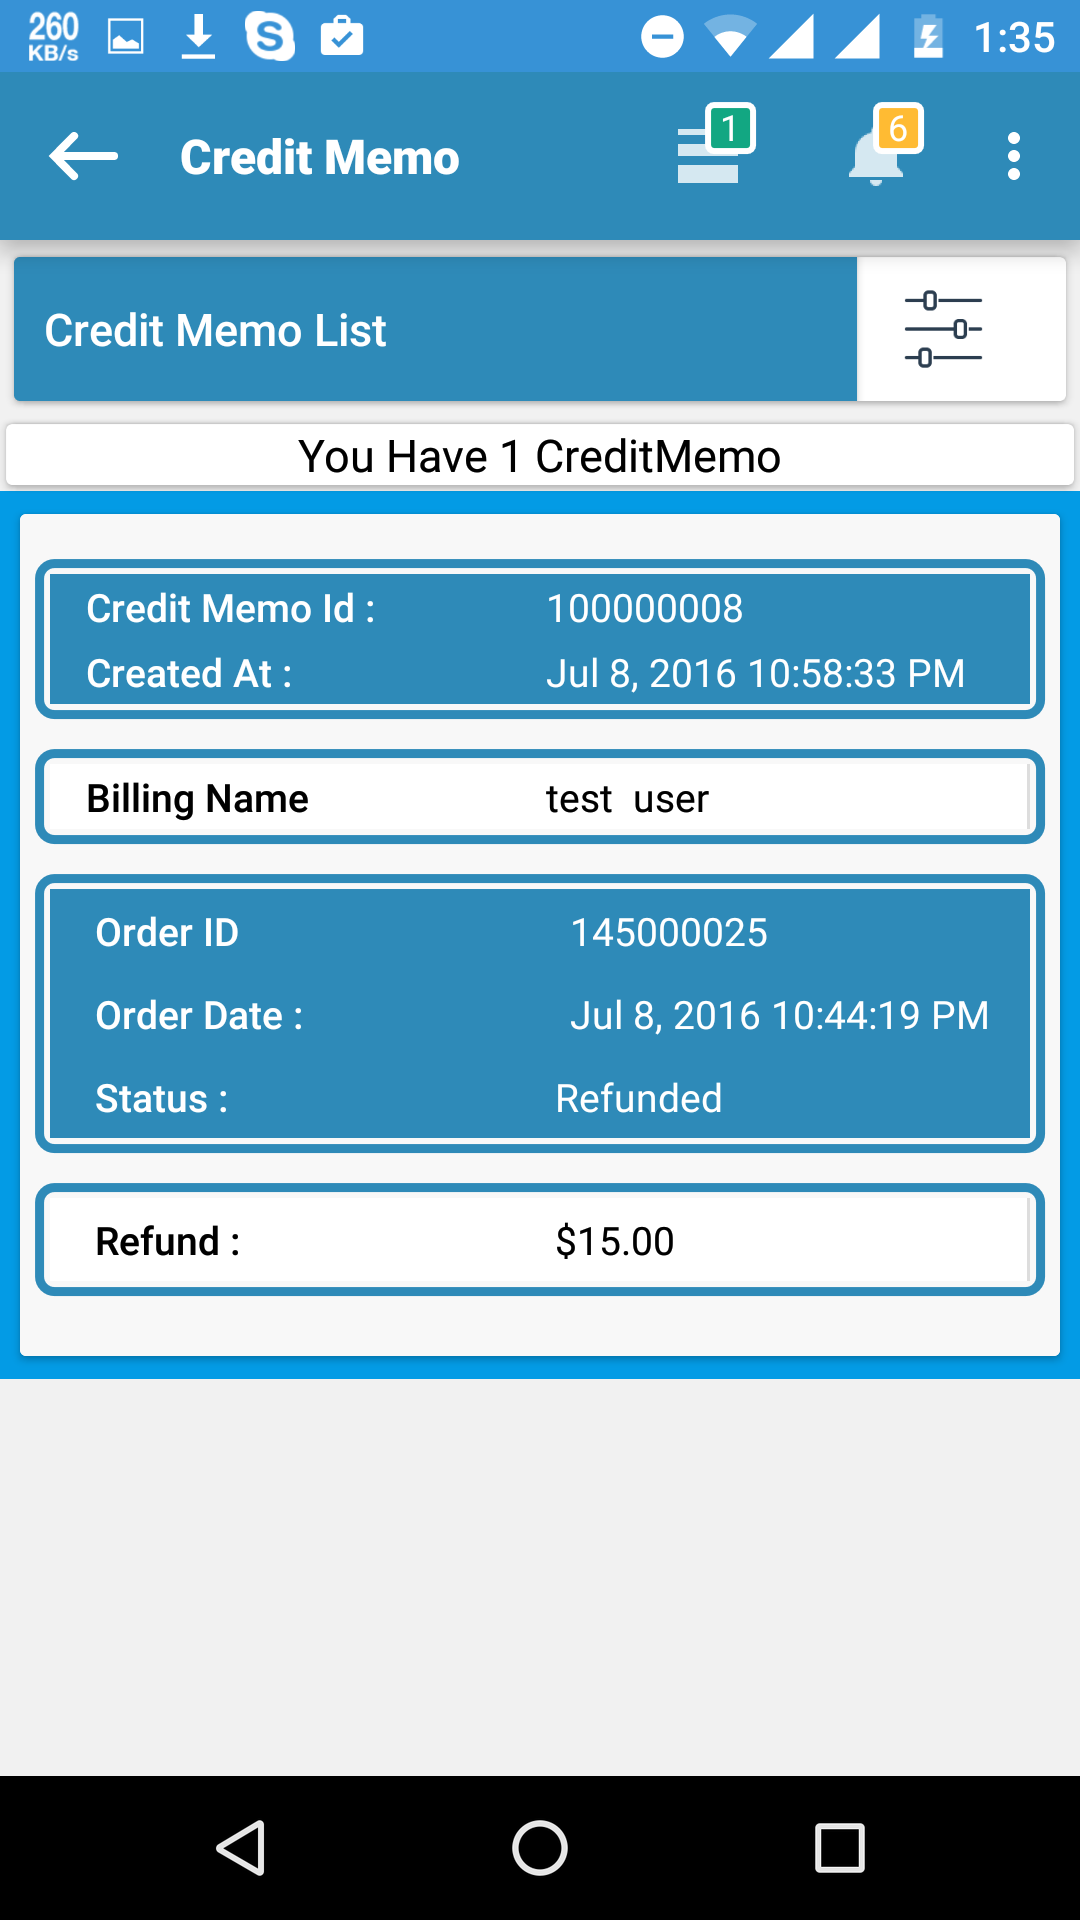
Manage Credit Memo
Multivendor Platinum APP allow vendor to create and view credit memos in case a product is returned by the customer.
Transaction
Multivendor Platinum APP allow vendor to view all the transaction's history done with admin for their orders. This section will allow vendor to view all the details of the transaction from "Transaction Details" page which displays the Beneficiary Details, Payment Method, Transaction Type, etc.
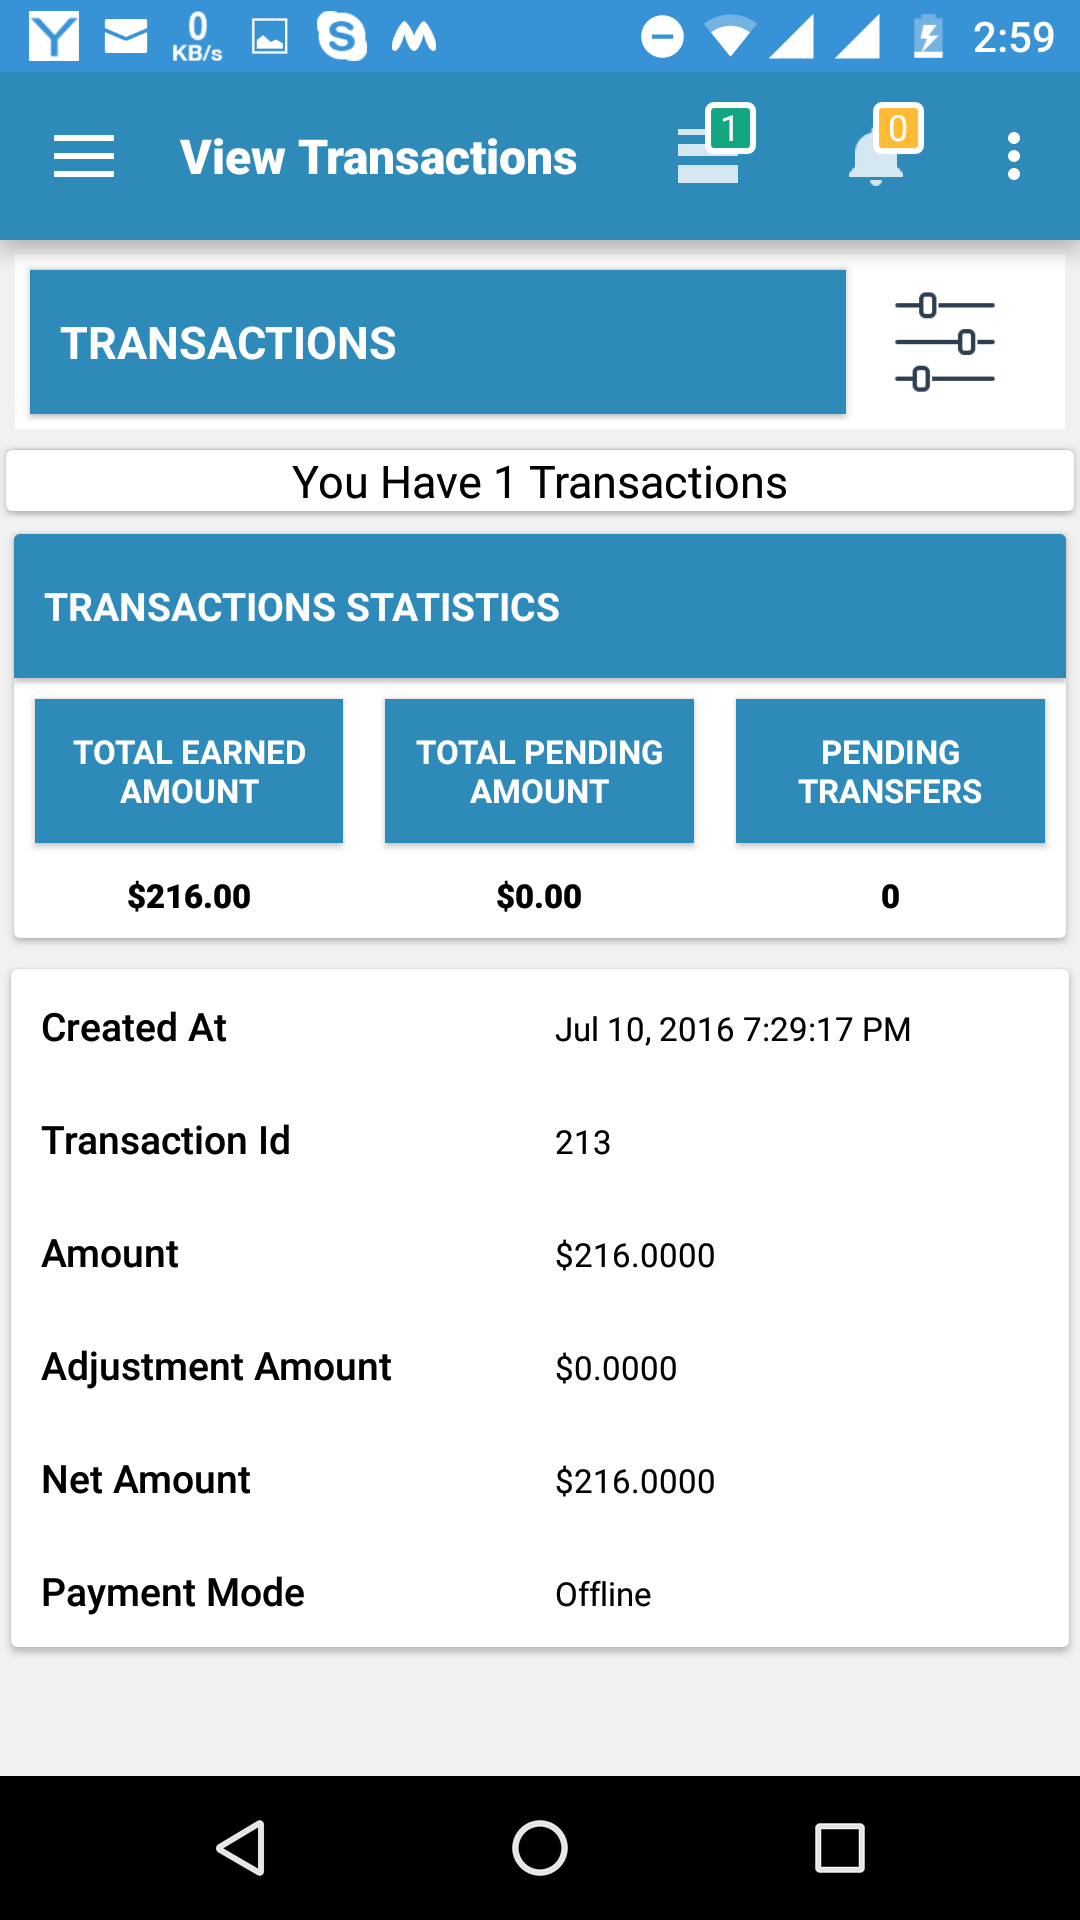
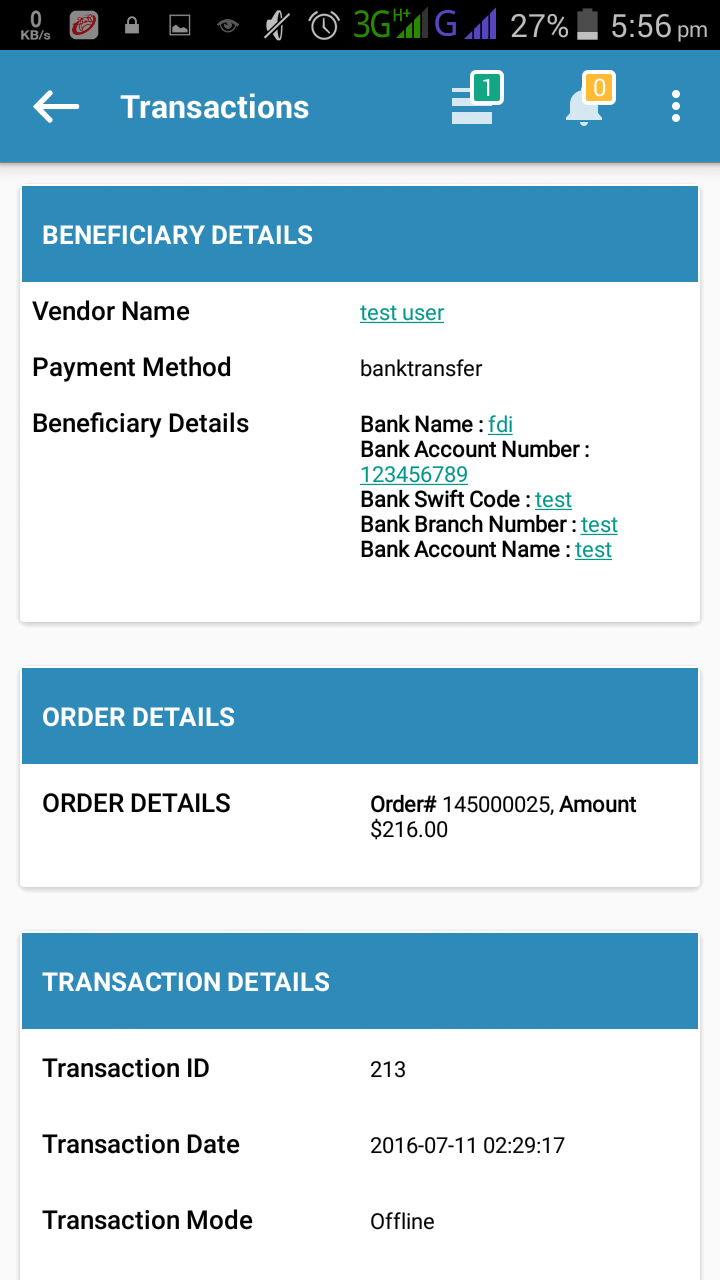
Note : Vendor will not be able to request payment if this functionality is disabled from admin.
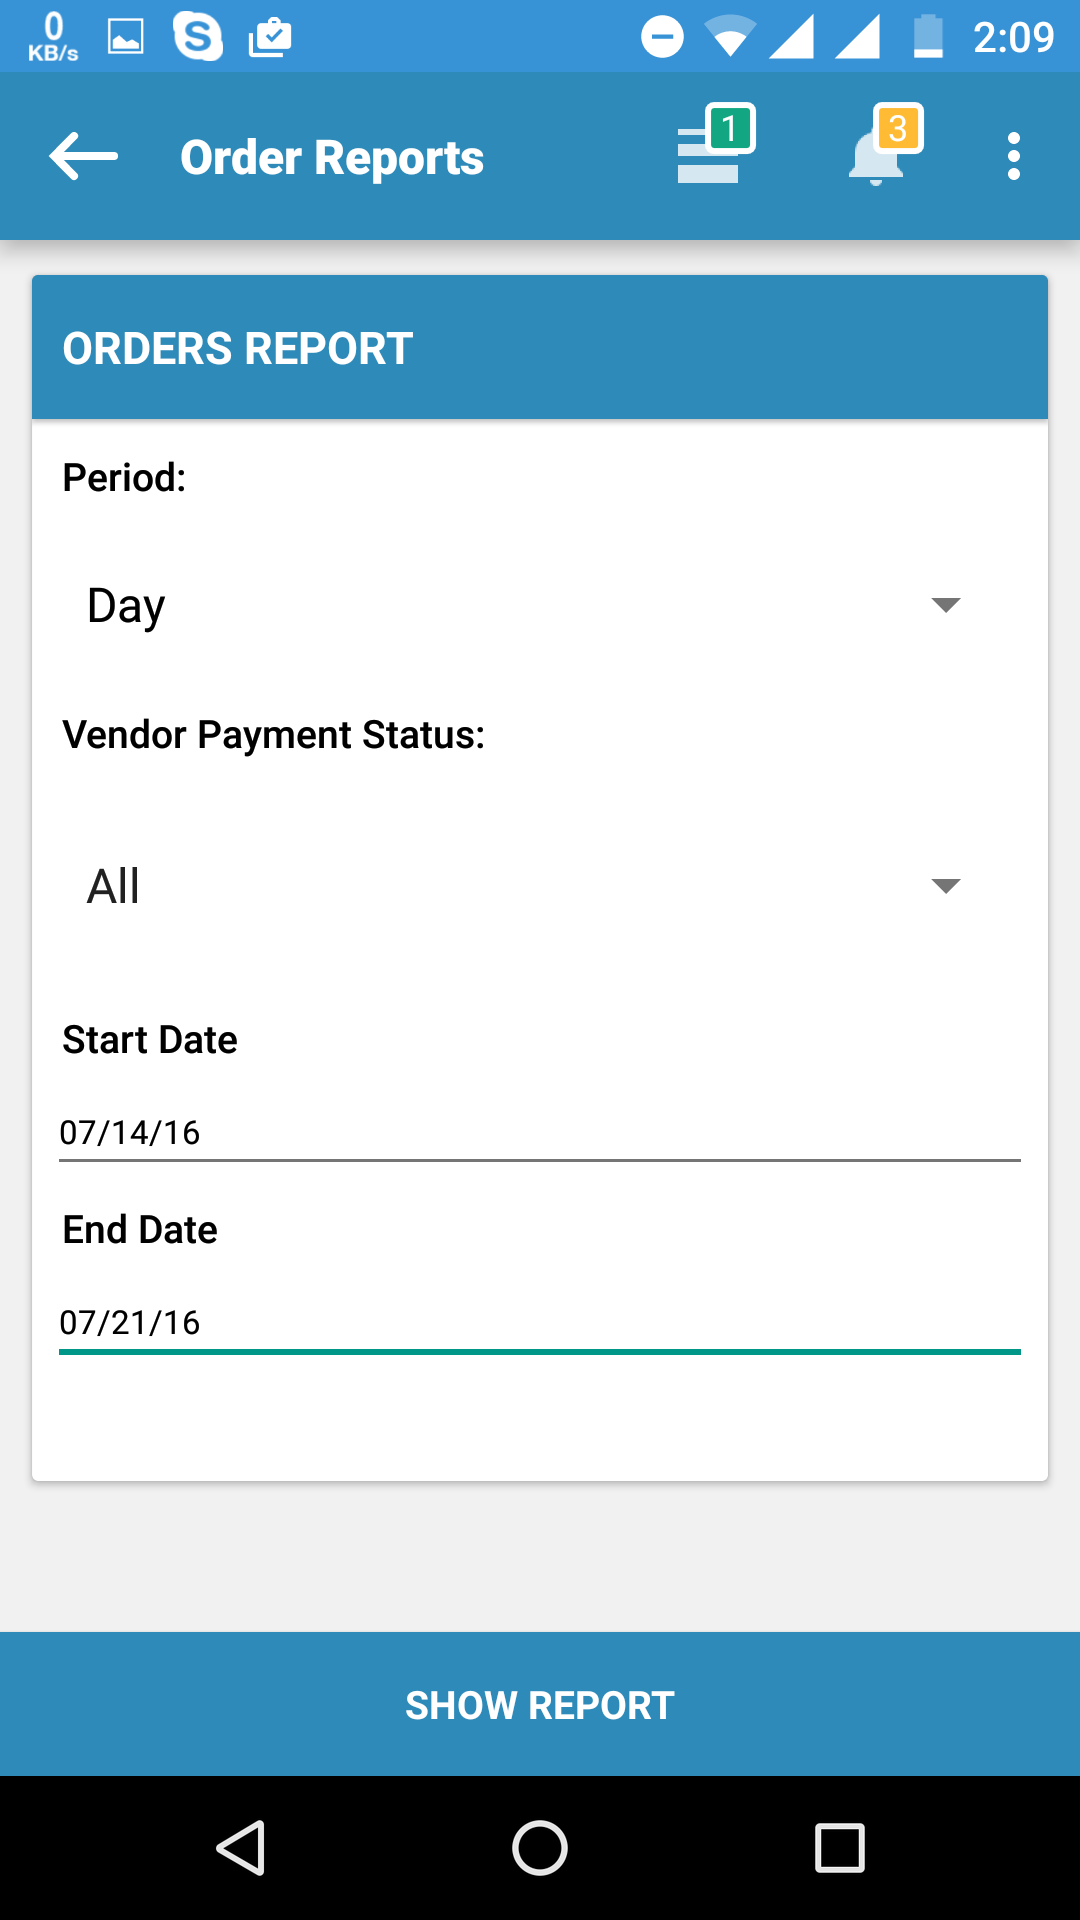
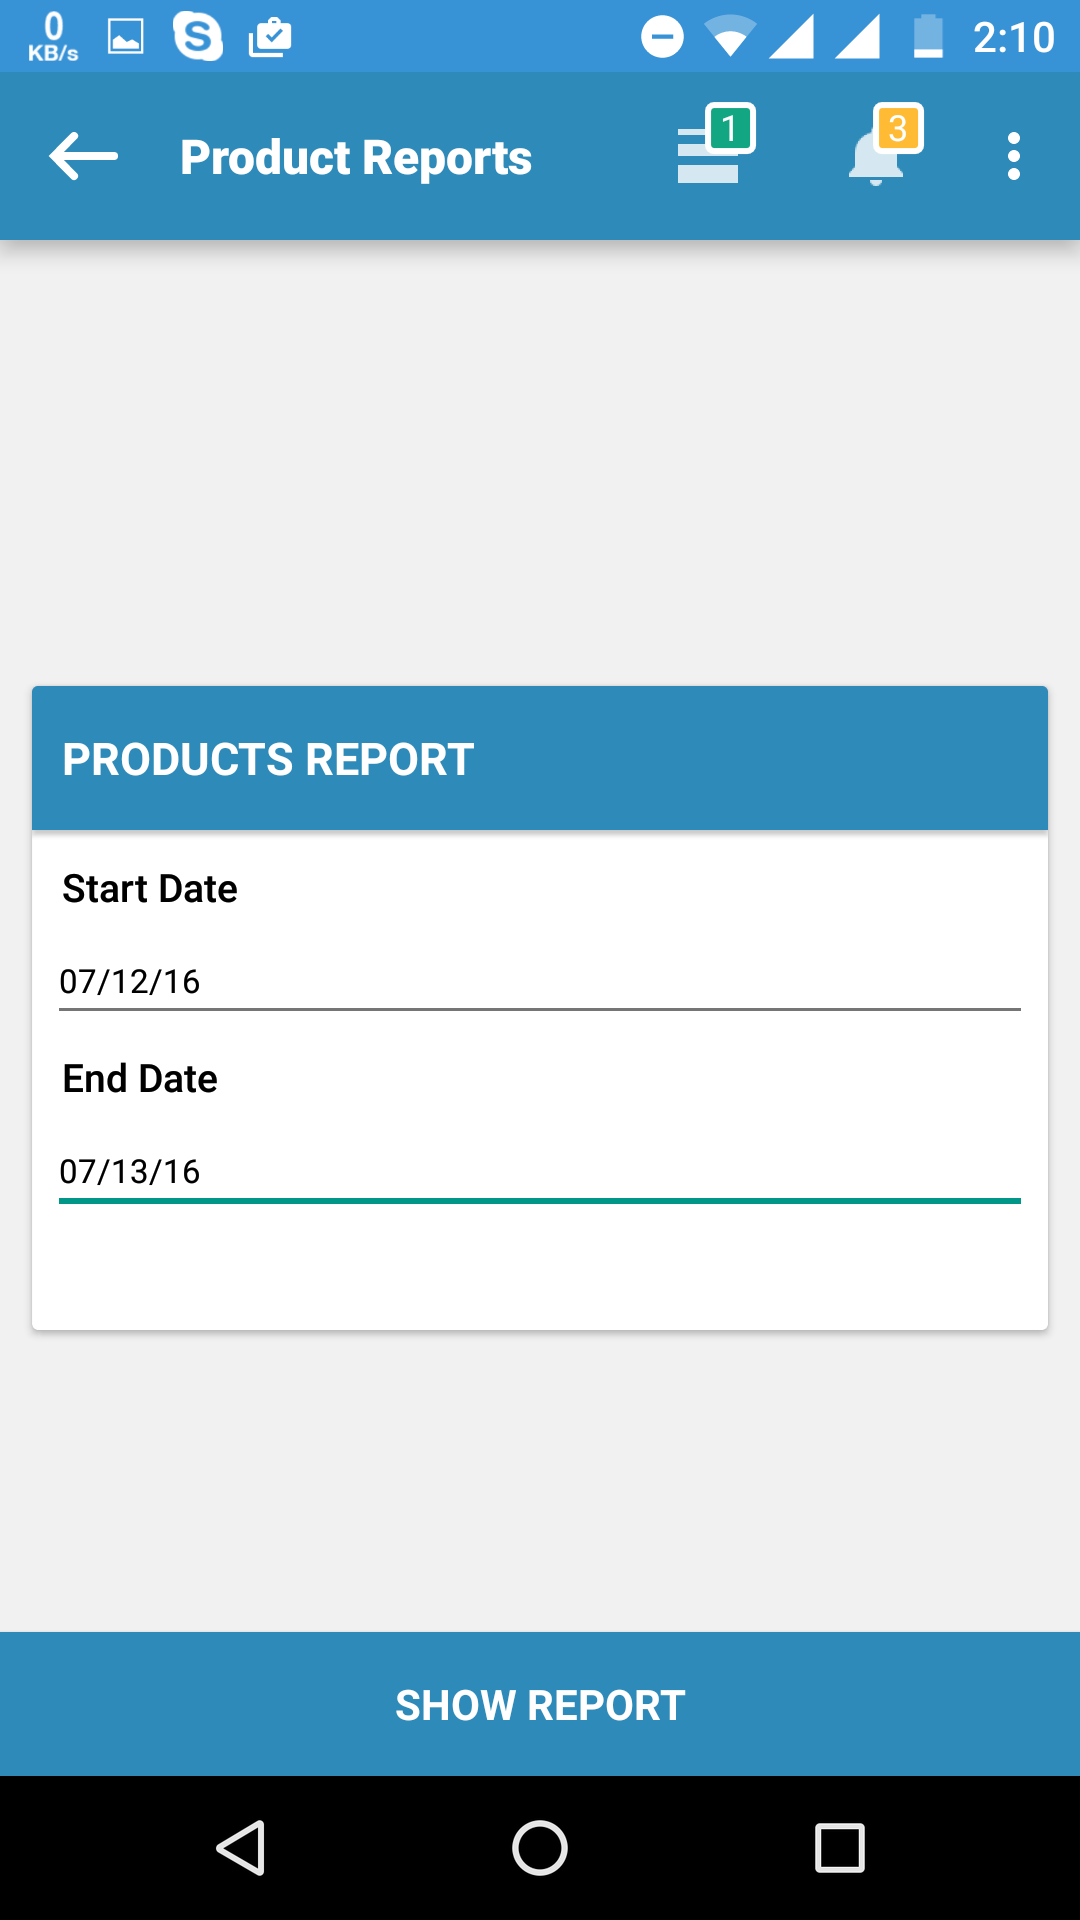
Report
This section allow vendor to see advanced report between certain interval of time. Vendor can see report of his order and product which gives him a quick estimate of how many orders where placed and for which product.
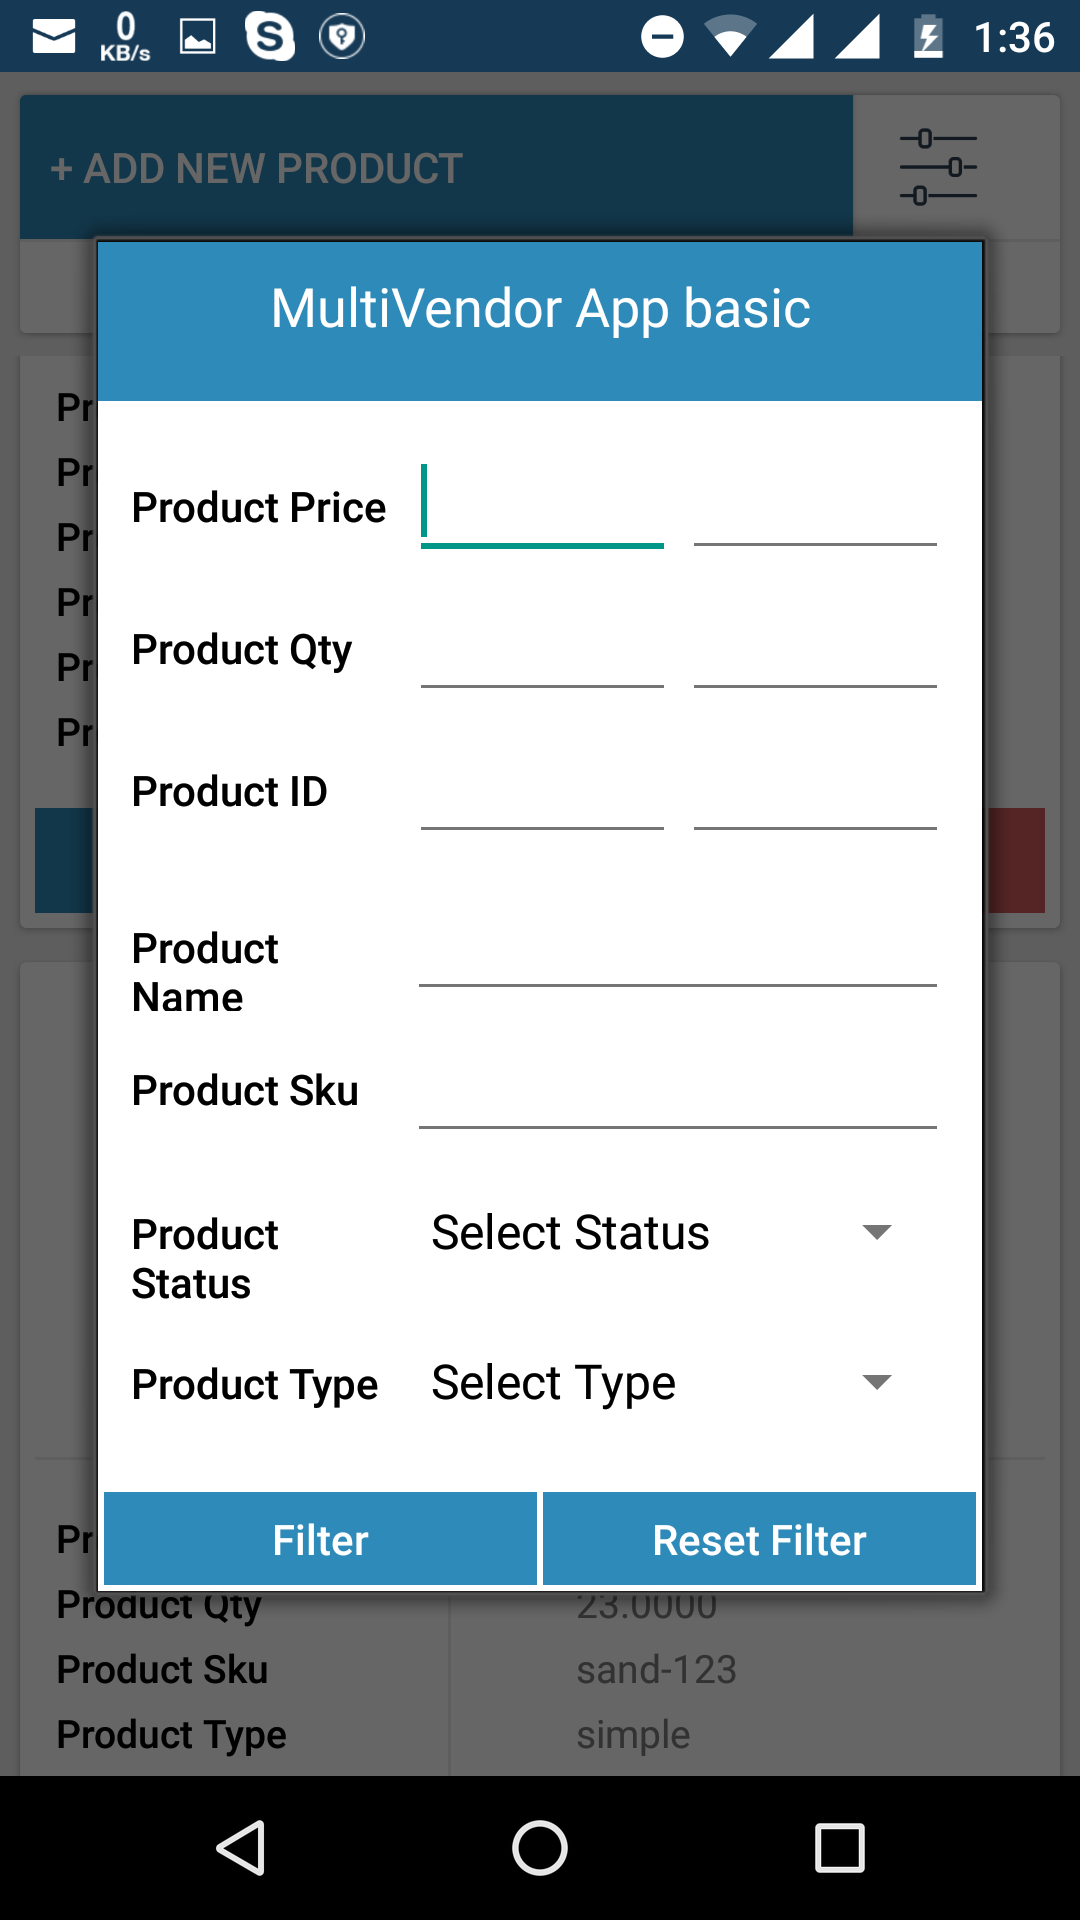
Order Report
Vendor can filter reports by day, month, year and Vendor Payment Status. Filtered Report will display Total Sales, Net Earned, Total commission, Total Products Count in each date, month and year.
Product Report
Vendor can also see Products Sales report between dates which will show total sales amount and quantity sold.
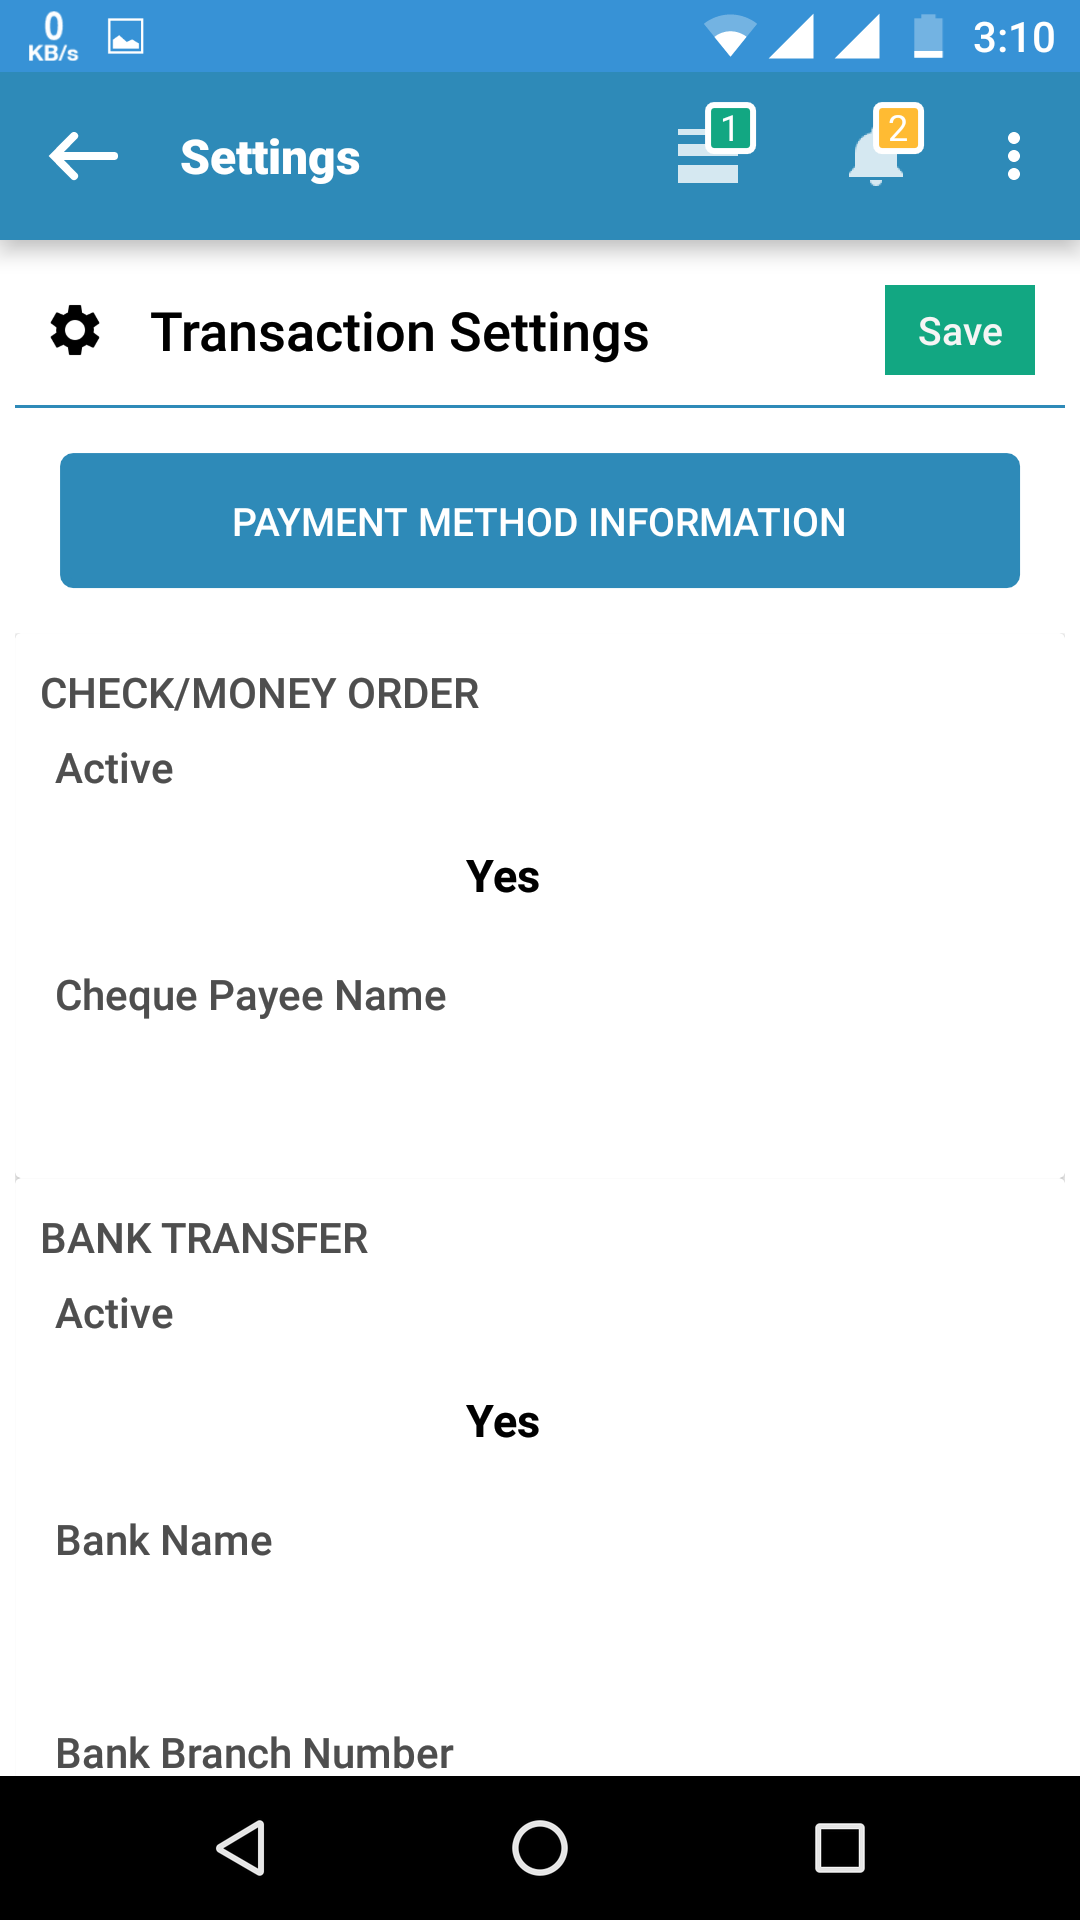
Transaction Settings
This section allow vendor to decide active Payment Methods and its details for All Admin-Vendor Transactions. The methods activated by the vendor will be visible to the admin on Credit/Debit Account page.
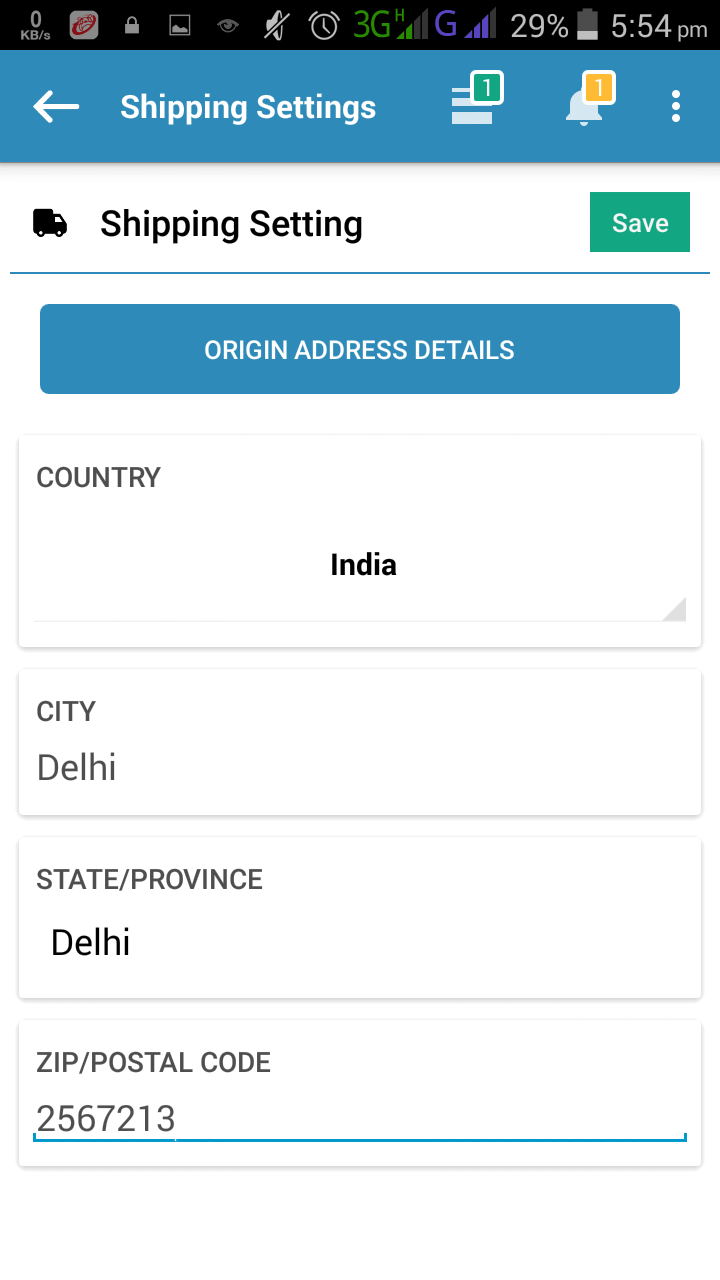
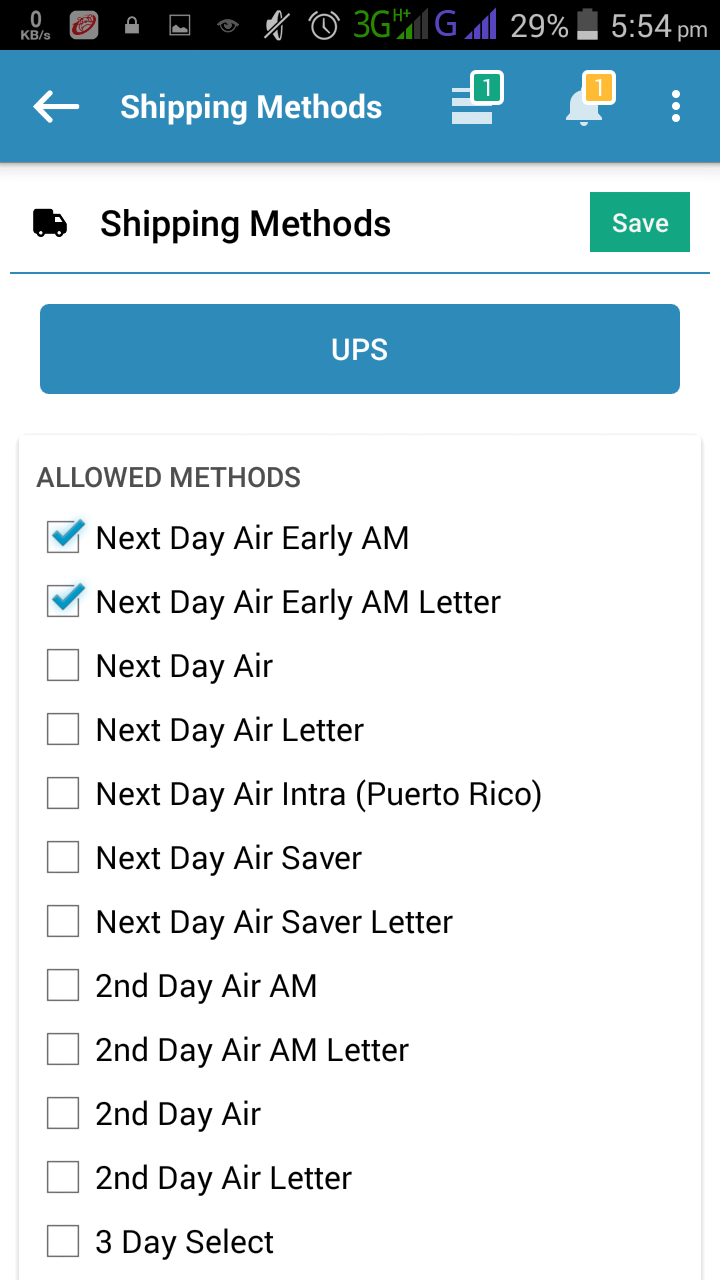
Shipping Settings
This section allows vendors to integrate United Parcel Service Shipping method for their products.
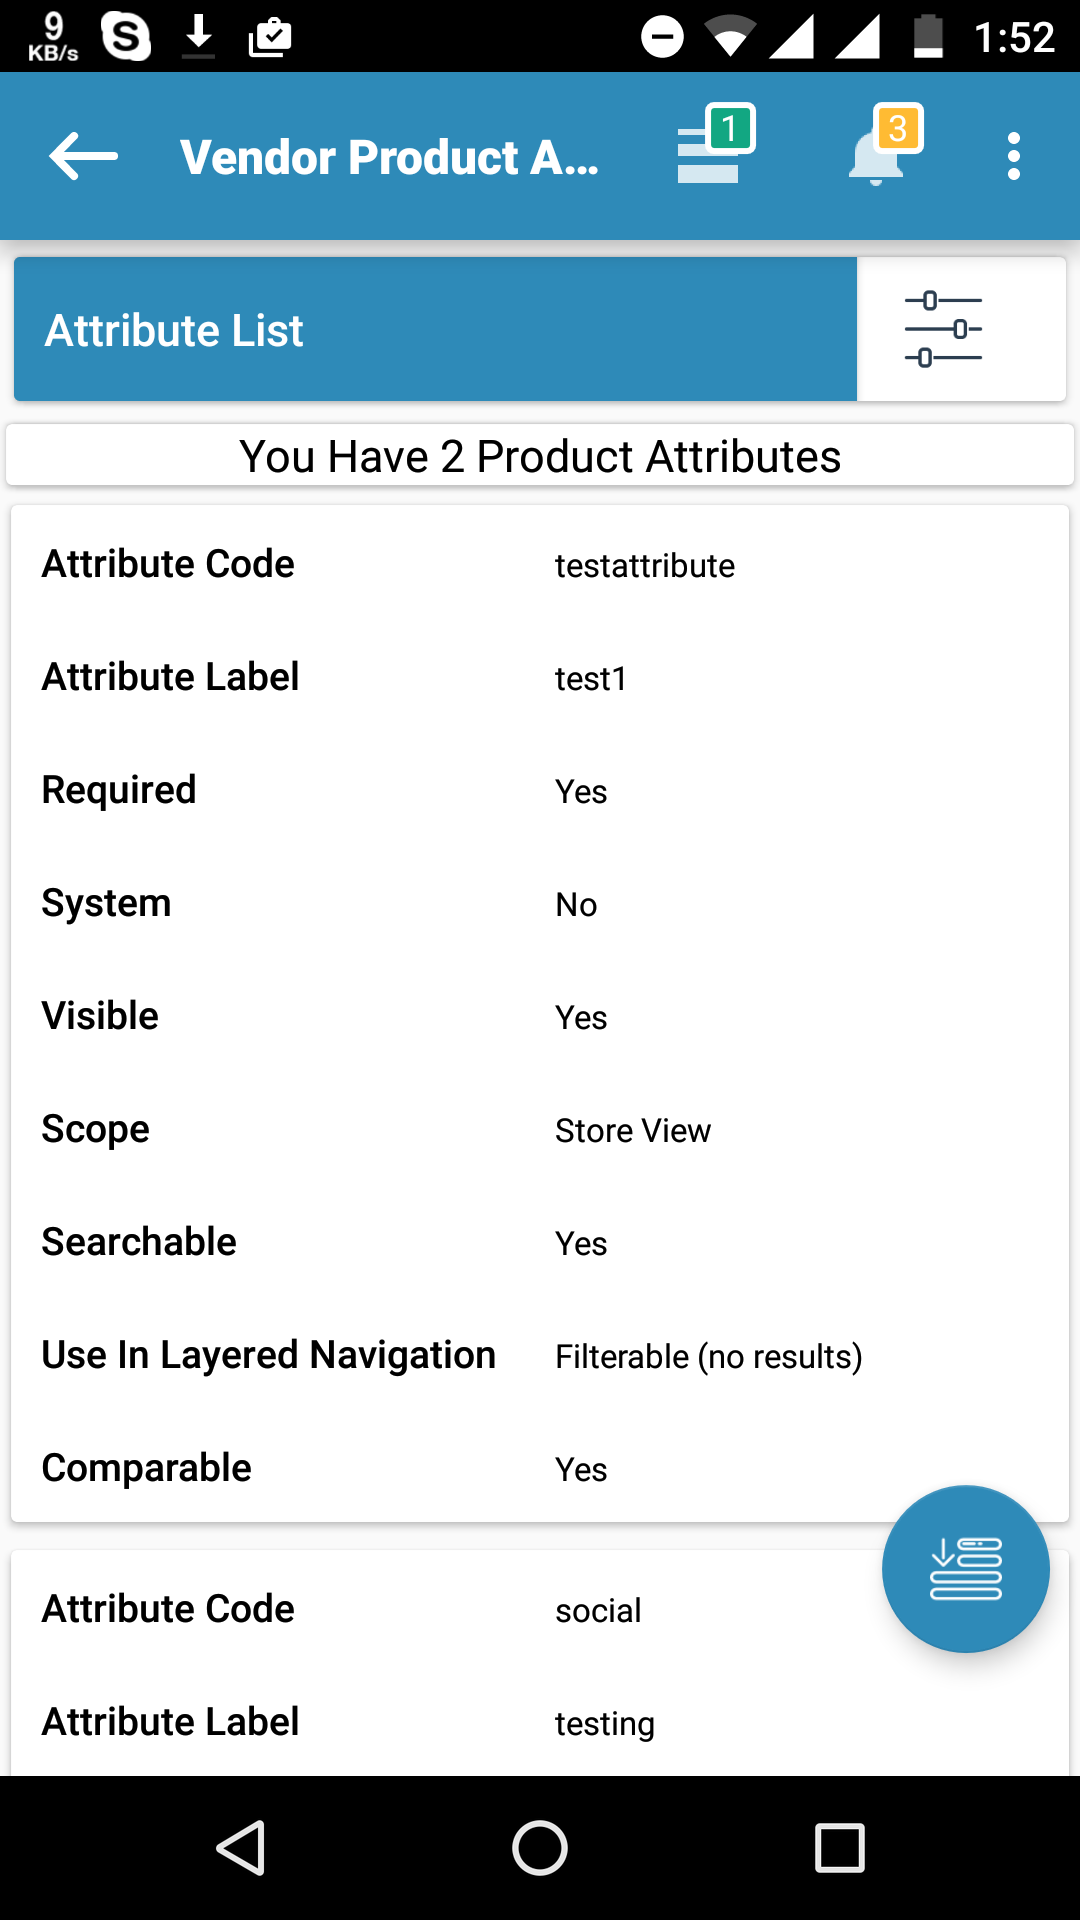
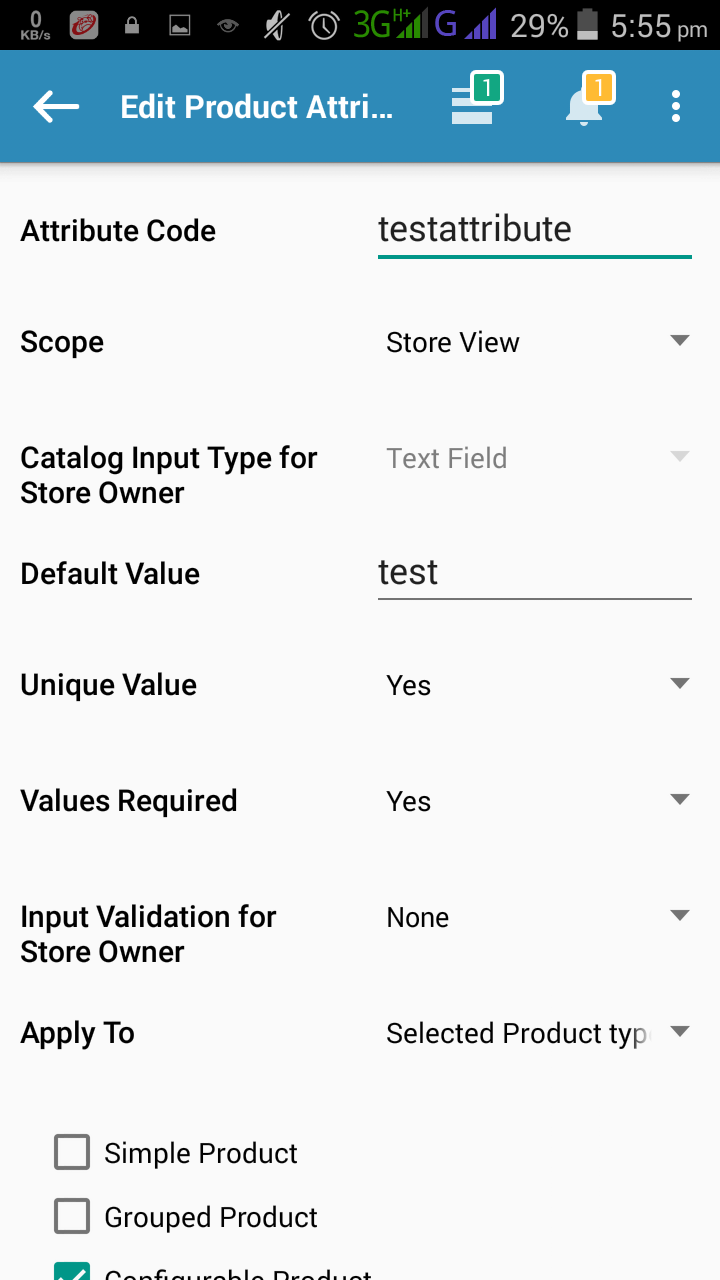
Vendor Product Attribute
Our Multivendor platinum app gives vendor the functionality of attribute creation without admin intervention. It requires Vendor Product Addon API as product related features will require Vendor Product Addon to work. As per the default Magento functionality only admin has the authority to create and assign attributes to products. But now vendors will also be able to do the same for their products by using this addon. Vendors can create attributes of their choice and assign them to their products using the attribute set which is provided to each vendor as soon as he/she logins to his/her vendor panel for the first time after the installation of this module.
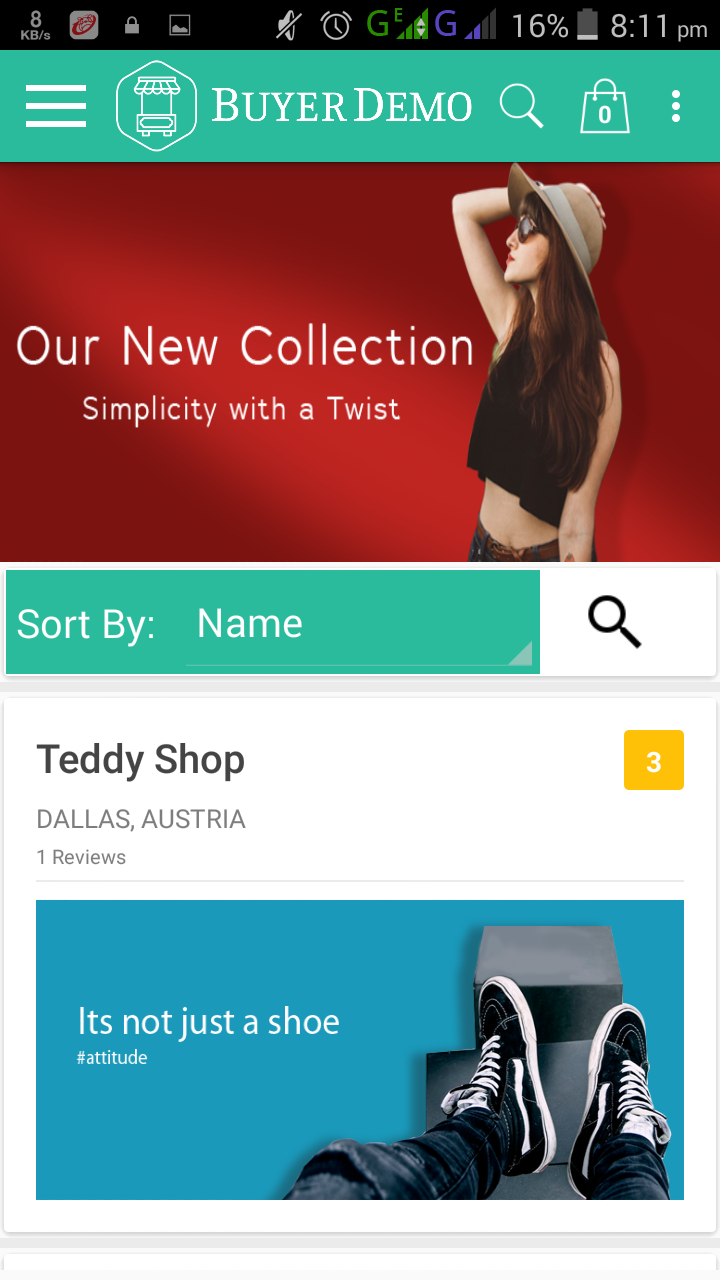
Marketplace Page
This page displays the list of all the approved vendors with their public shop names and their Company Logo/Image, Customizable Banner Image, Customizable Grid Image/Logo and Meta Information.
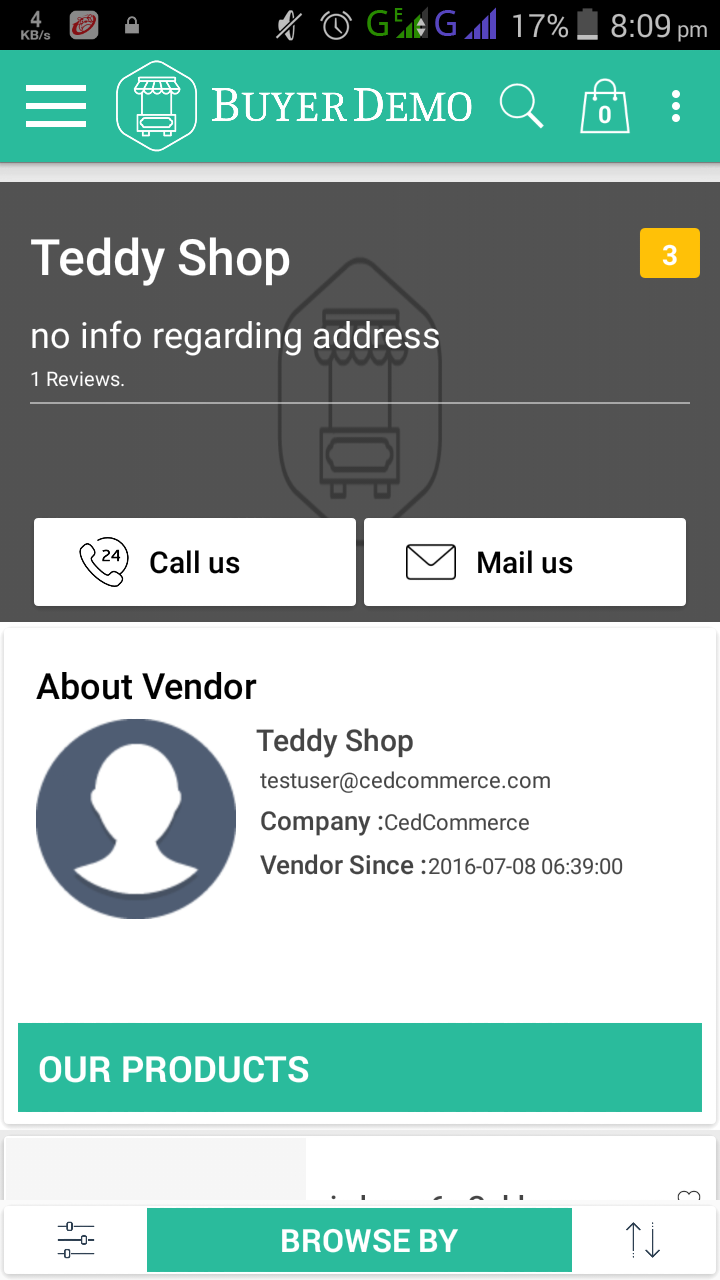
Vendor Shop Page OR Micro site
MultiVendor APP provides dedicated shop page for every vendor which contains Profile Information and Product Collection. Shop logo and Banner will also be visible on this page along with Meta Information, Find us on Facebook link and Follow us on Twitter link. In other words, all the information that is being entered by the vendor at the time of account creation will be displayed on the Vendor Shop Page.
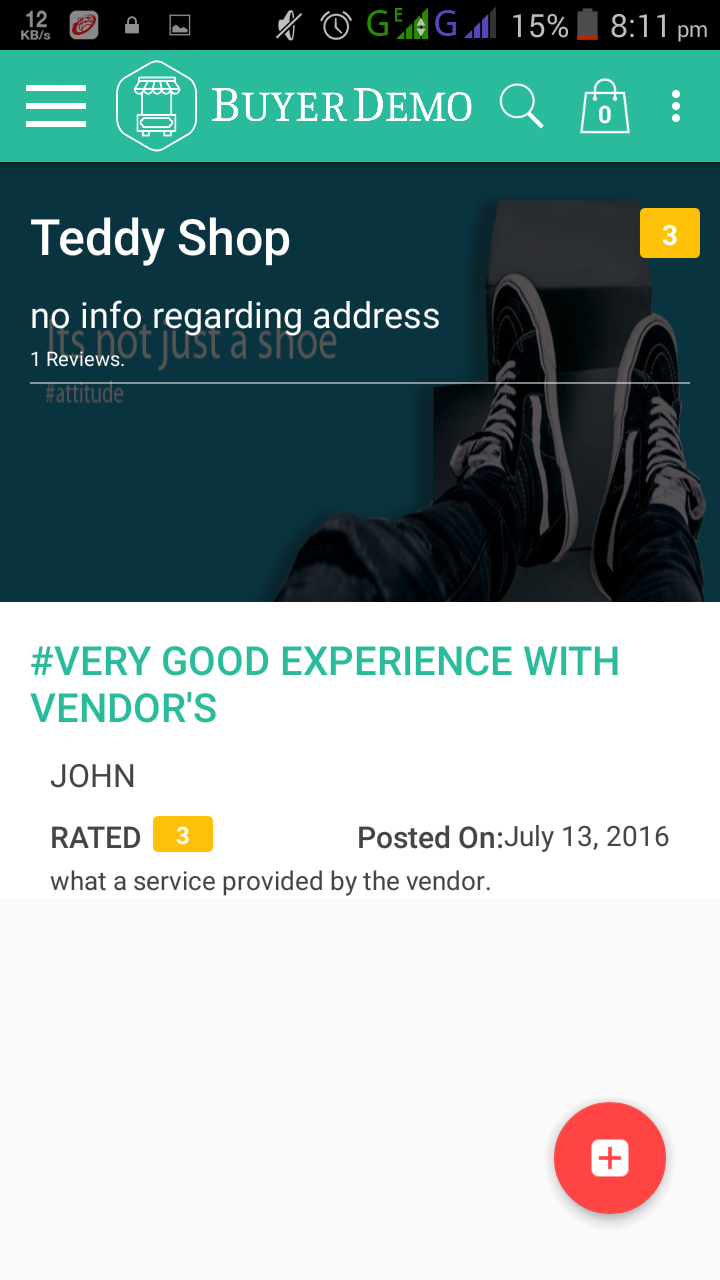
Vendor Review And Rating
MultiVendor Platinum APP will allow the customers to rate the vendors for their services at marketplace page. Customers can see the ratings and reviews of each vendor. Admin can create the vendor's rating items and manage all the reviews.